"THE MOST PERSONAL IS THE MOST CREATIVE"
- MARTIN SCORSESE
I usually start off with some elaborate paragraph about how great my project is, but not today. Today, I'm going to tell you a story.
A STORY
By the end of my first year of college, it was my time to serve in the South Korean army. A requirement for all South Korean males above the age of 18, it was simply a duty I had to fulfill, whether I wanted to or not.For 545 days, I had to live away from everyone and everything I knew in a completely foreign environment, often surrounded by people whose sole purpose seemed to be to inflict pain and misery to those underneath them, including me. I was often called ridiculous nicknames and forced to make a fool of myself in front of people who were constantly intoxicated in their power trip simply for the fact that they entered service three months before I did. For 18 months, I was usually no more than just a plaything for my superiors to toy around with whenever they were bored. Sometimes, I cried quietly alone in one of the bathroom stalls. It was a tough 545 days, but fortunately I was able to find great solace in doing what I loved the most: designing electronics.
As much as I loved it, designing Time Machine Mk. 8 was an exercise in extreme frustration. While I had access to a computer lab, the computers all booted into RAM, meaning all installed programs, online accounts, and saved work disappeared on shutdown. I had to use Google Drive to save any work, but the computers would very often freeze at random without any warnings whatsoever, throwing away hours of my work and requiring me to go through the tedious process of installing everything all over again. Due to the nature of life in the army, I wasn't able to work on TM8 during the weekdays, and I only had a handful of hours during the weekends. So every Sunday, I printed my schematics and PCB layouts, and studied them during the week whenever I had time. I circled any errors and mistakes with a red pen and wrote down plans for fixes on my little red notebook. Every weekend, I brought my notes to the computer lab to work. Printing my work was a complete nightmare by itself.
The more I worked on TM8, the greater my dedication became. The computers (and especially the printer) often brought my patience to its absolute limits, but it was all I had. I often starved myself to save money for parts, and instead quenched my hunger with unhealthy amounts of instant coffee. I didn't care about the crappy computers and nerve-wracking lockups, as long as I made progress. During my last six months of service, I spent pretty much every single weekend in the computer lab working on TM8.
TM8 is not impressive at all from an engineering perspective. It's just a simple microcontroller board with some sensors, and it took really long to make. But it's the process and my undying passion and love for what I do, that makes it so incredibly special, at least to me. It gave me something to focus on when my life was at its hardest, and gives me immense confidence for whatever lies ahead. I know no matter where I am, as long as I give it my all, just like I did so with creating Time Machine Mk. 8, everything will be alright.
SPEC LIST
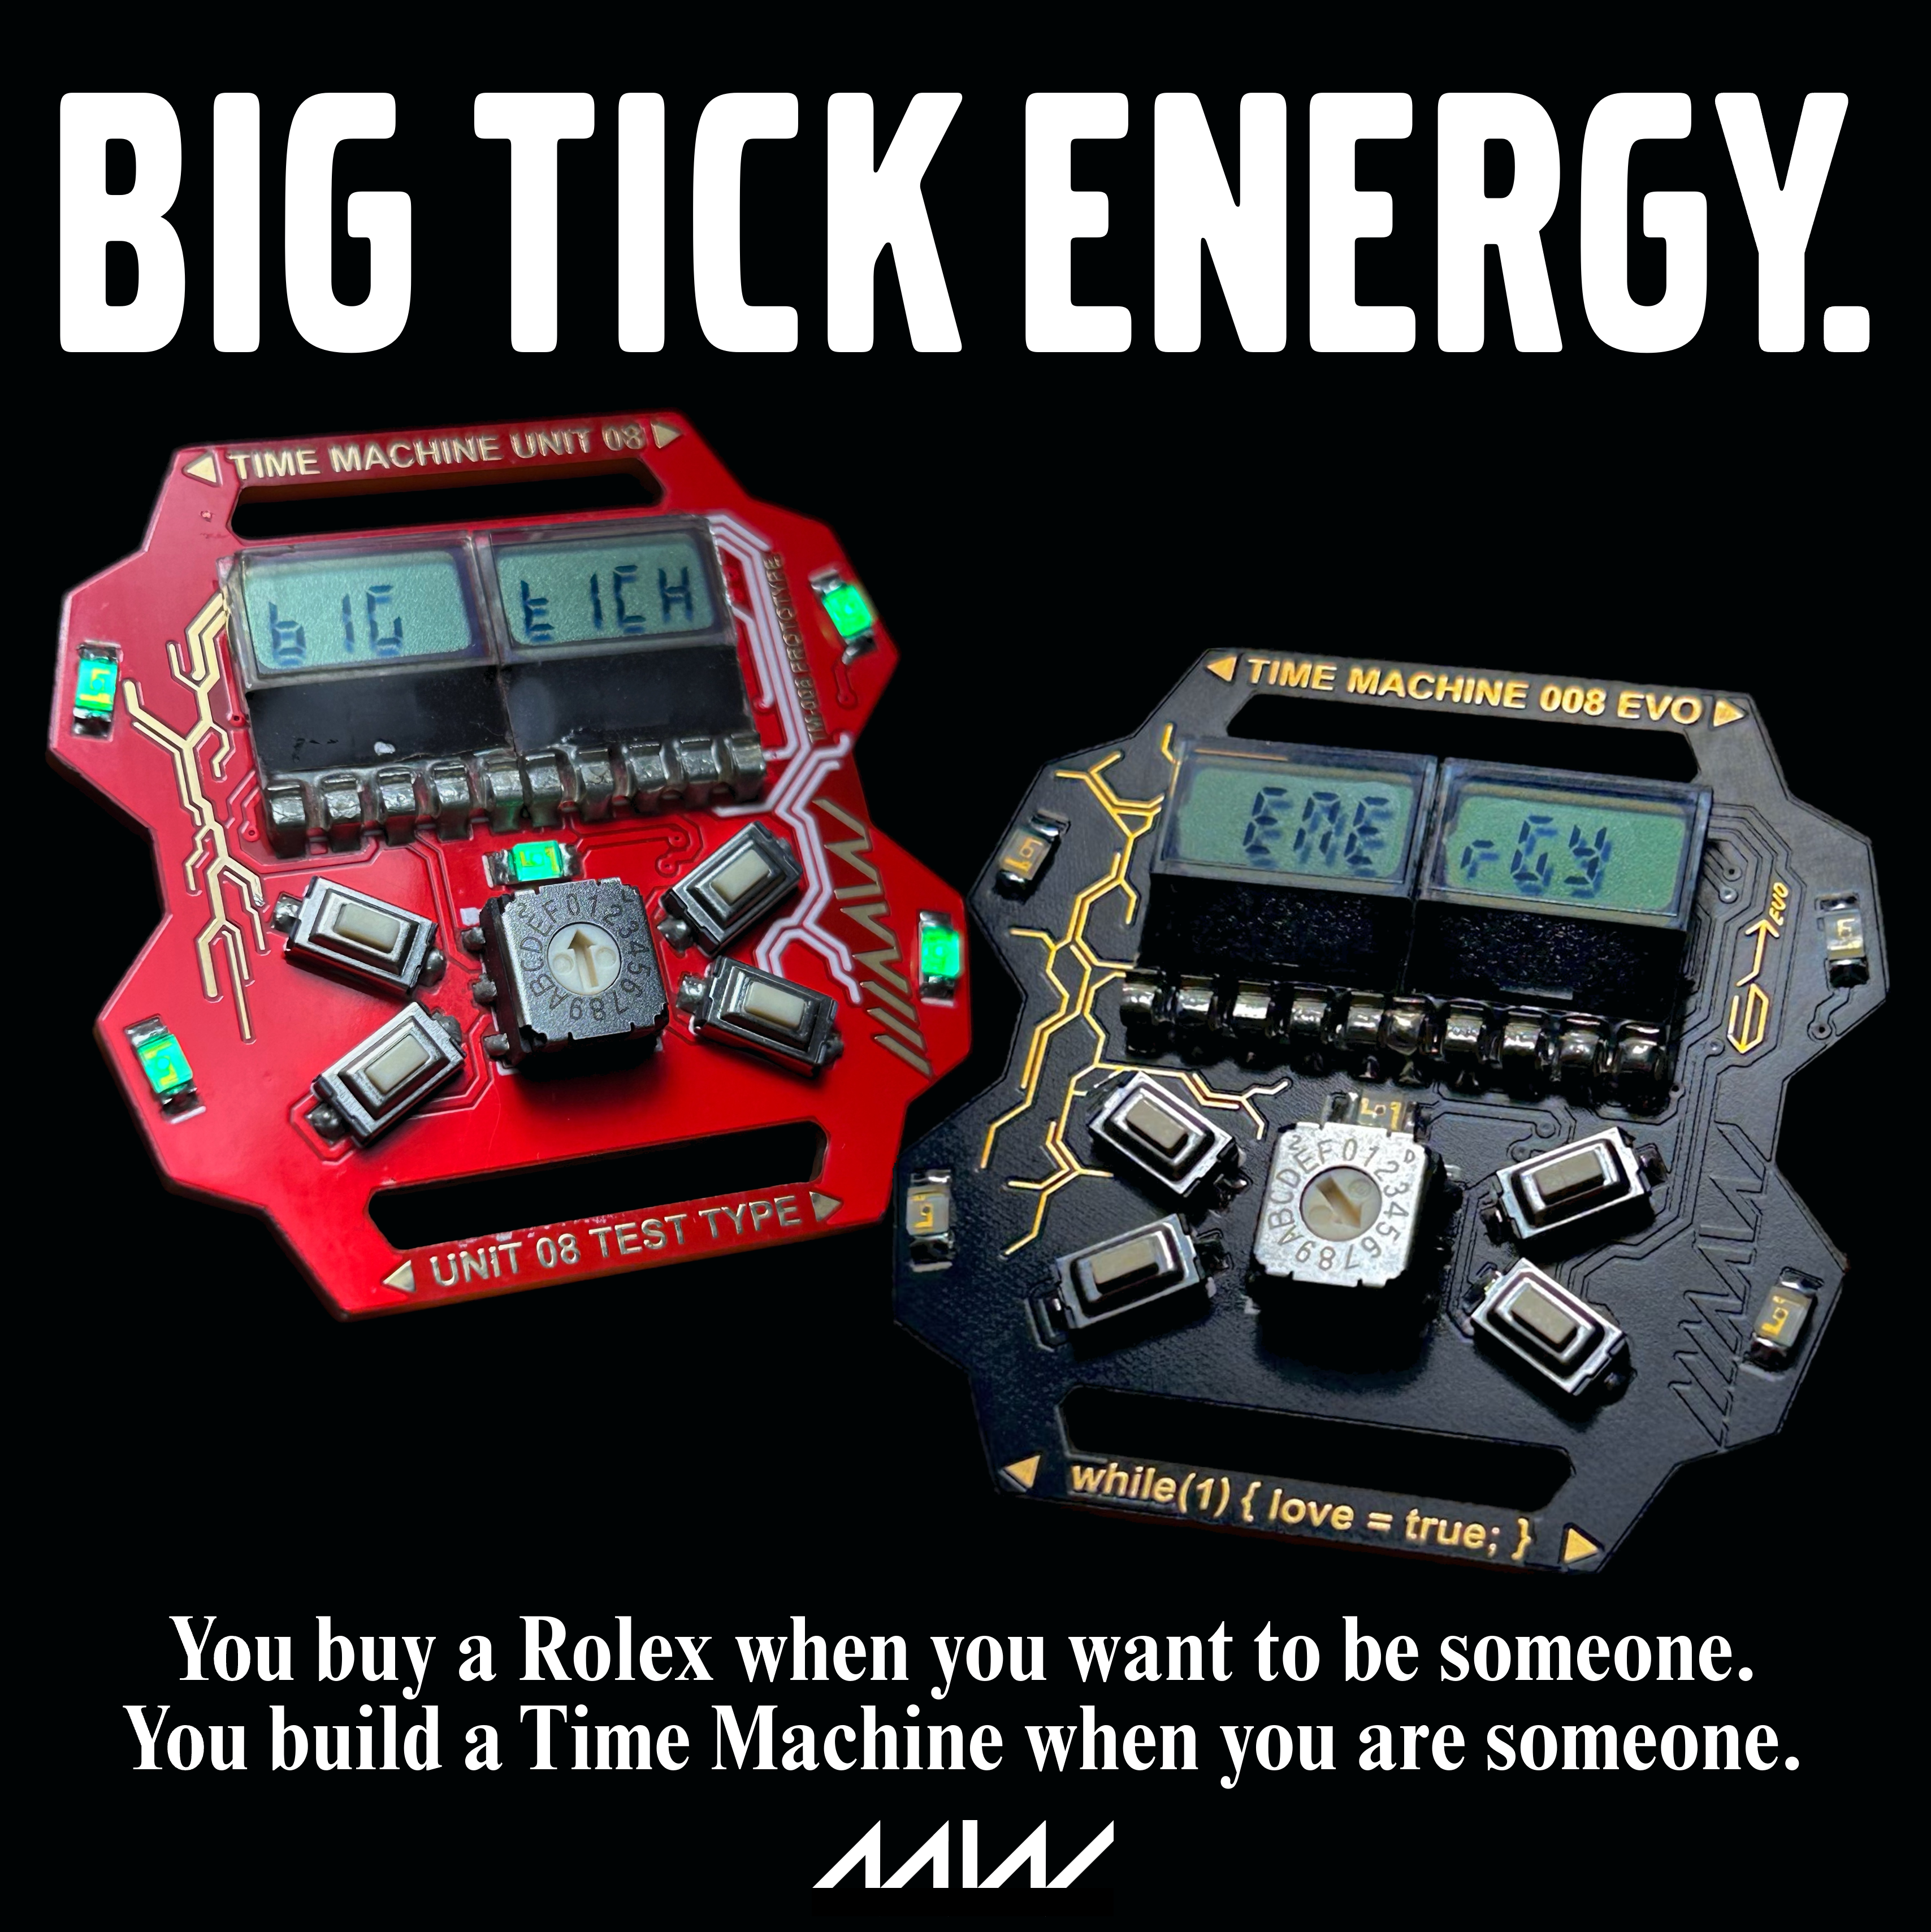
Now... Where do I even start? Time Machine Mk. 8 is such a thorough amalgamation of everything that defines who I am, and it brings my mind to a standstill whenever I try to talk about it. From the Formula One inspired front fascia design to the flared fenders inspired by the Lancia Stratos, TM8 is basically what I would be if I was an electonic gadget, as weird as it may sound. While to the outsider, it may seem like just another hobbyist project, to me it resembles so much more; painstaking attention to detail, the relentless pursuit to an unwavering objective, the constant search for sources of motivation and inspiration, and the circumstances under which the entire project was conceived, designed, built, and executed. When I look at the seconds tick by on its tiny LCD screens, it's almost like watching my child blow bubbles in the backyard. I mean, I don't have a child, but the emotions I get from Time Machine Mk. 8 gives me a pretty good idea of what it would be like.
I'm not going to keep waxing lyrical about how sentimental this weird gadget is to me. I just hope my undying love and passion for this project, and engineering in general, seeps through my words, even if it's just a miniscule fraction. I also hope you, the reader, can gain some insight into my philosophy and thought processes as an engineer.
Before any significant work was done, I set myself a set of strict design regulations for Time Machine Mk. 8:
TIME MACHINE MK. 8 DESIGN REGULATIONS
These regulations were designed to vastly improve the Time Machine Mk. 8 compared to previous generations, but also to challenge myself as a hobbyist engineer. I knew immediately from the start of the project that this would not be easy. With these regulations, TM8 was no longer just some dorky little watch with glowy LEDs. It was now a legitimate engineering project that would test my skills and perserverance as an engineer. I wanted Time Machine Mk. 8 to be a legitimate precision tool capable of measuring time with millisecond accuracy, while also featuring small tools such as a thermometer or a flashlight. It wanted it to have a clean but striking design with my own personal flair to it. I wanted it to be worn every day with genuine comfort with full-day battery life. This all seemed like too much to accomplish. Basically, the Time Machine Mk. 8 had to bake its cake and eat it too.
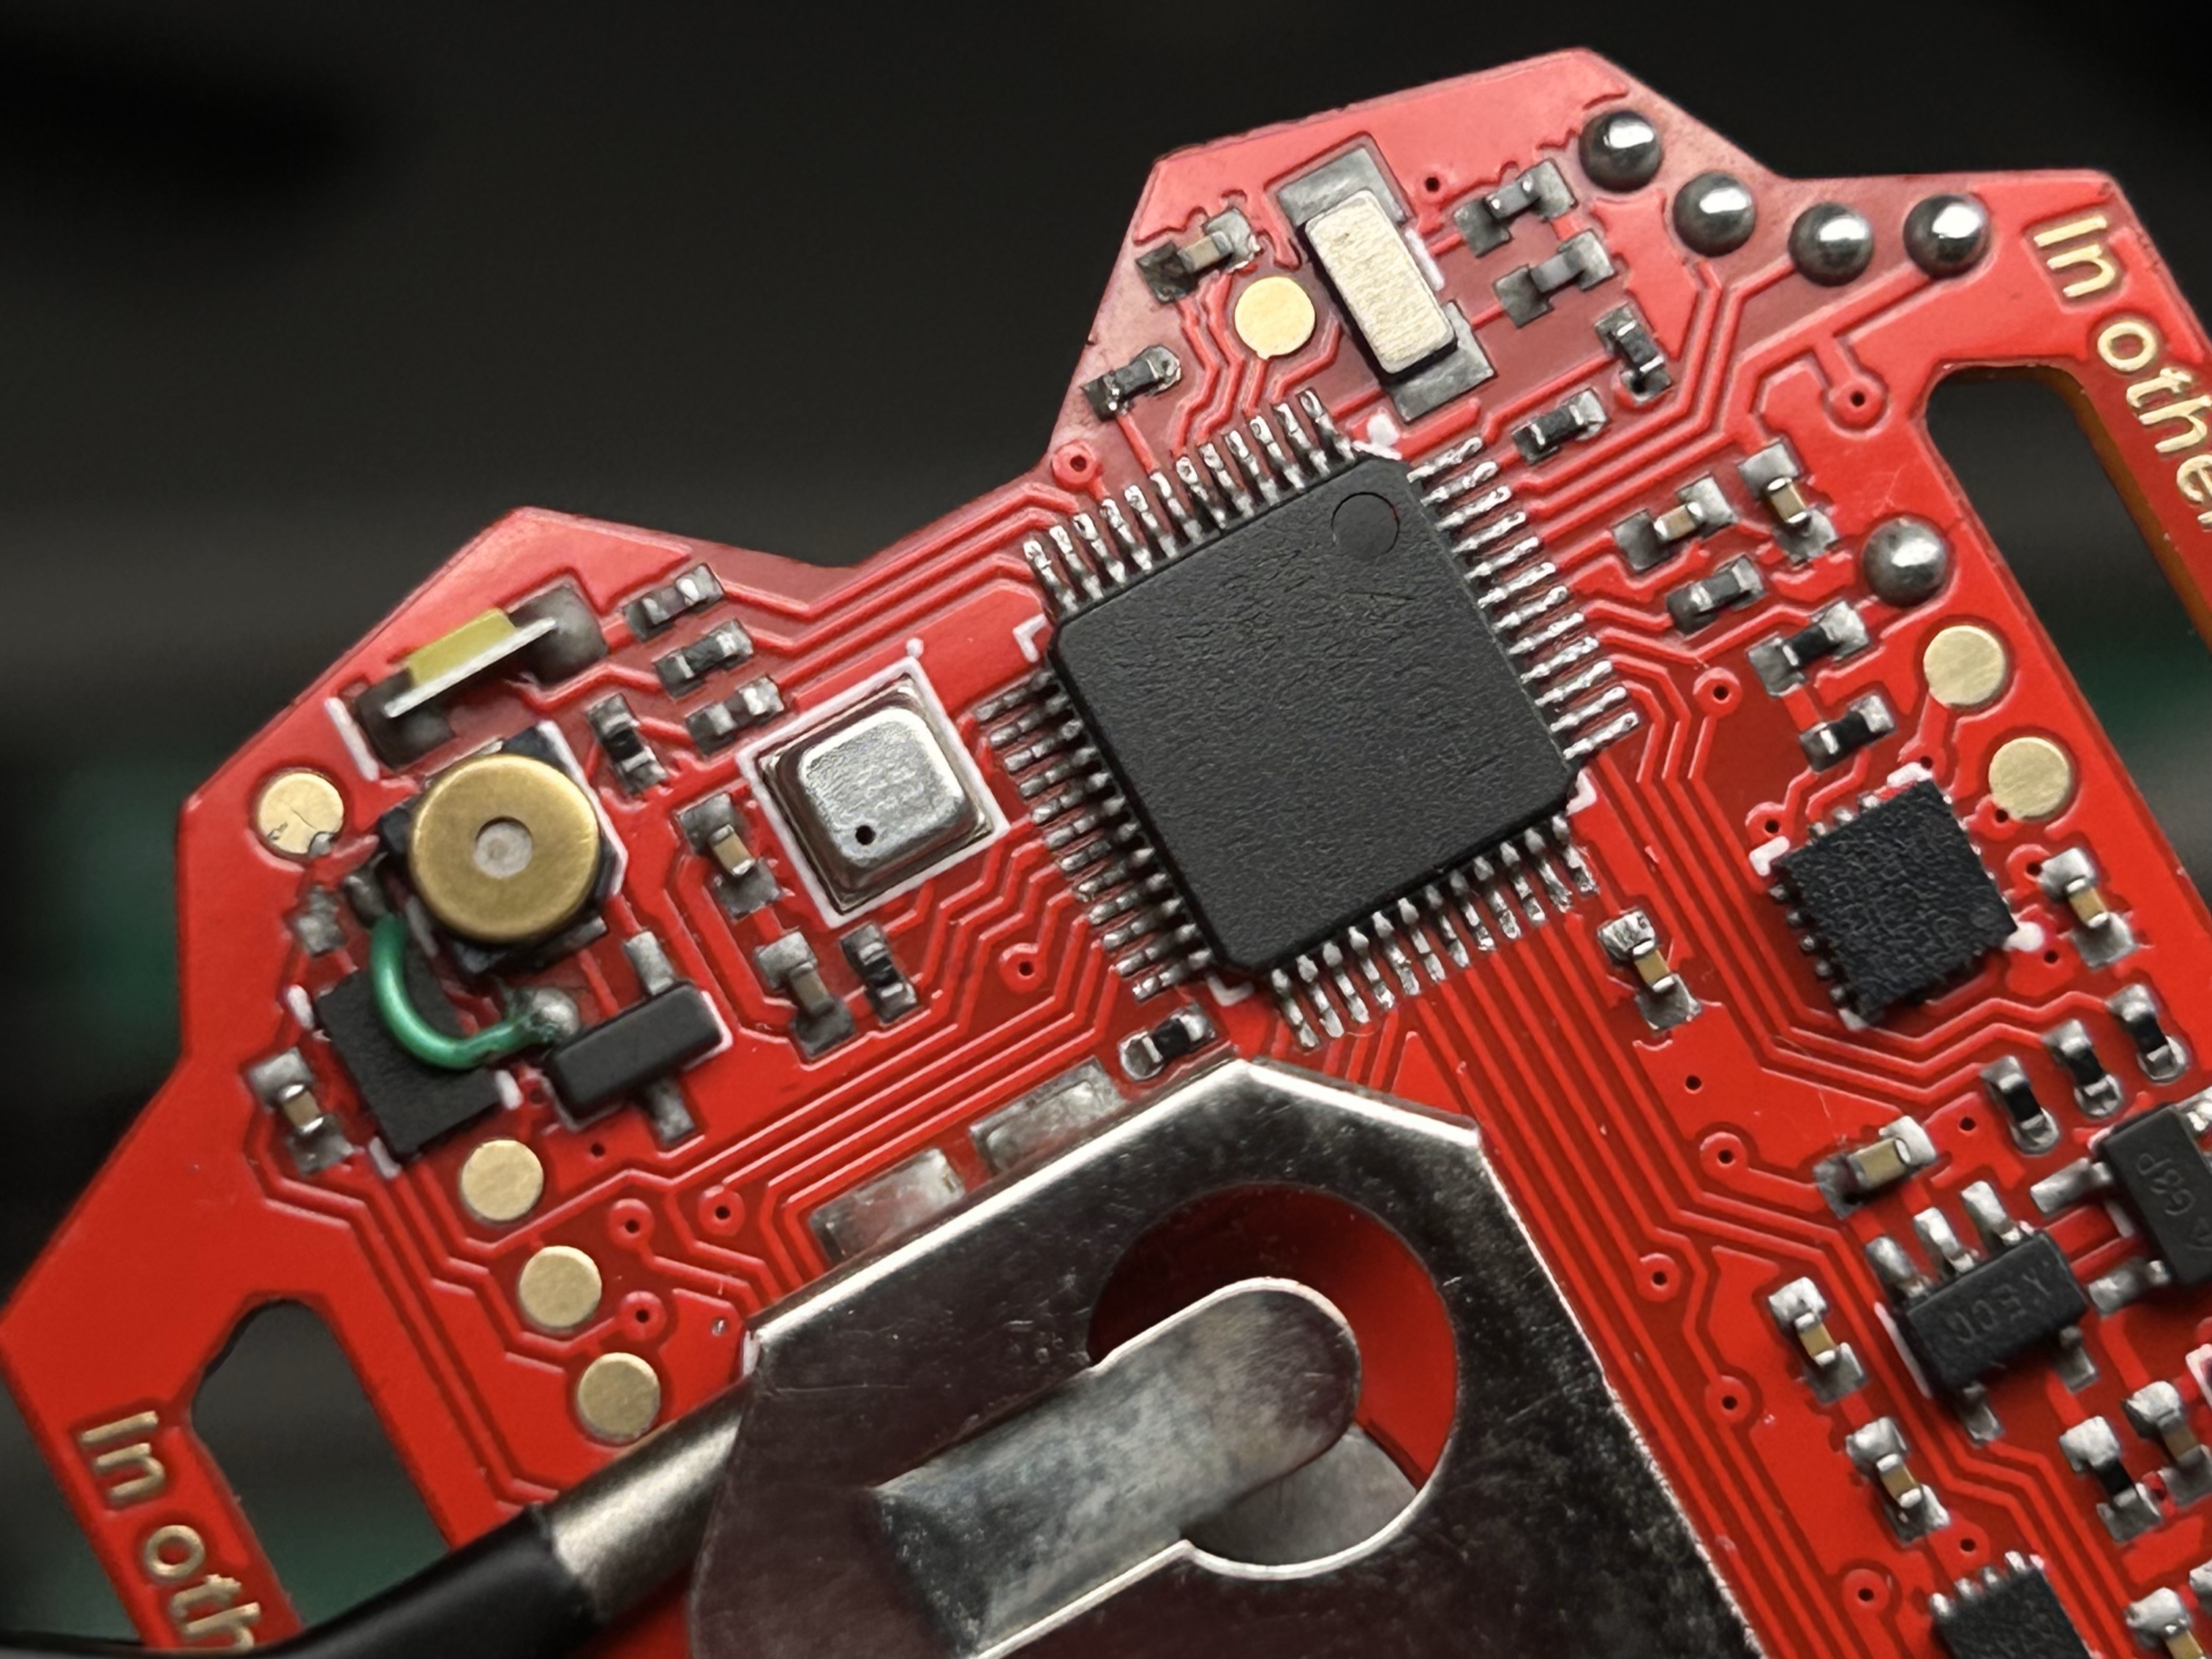
Furthermore, a lot of my regulations required knowledge I did not know yet, which meant I had to browse through hundreds of datasheets, as well as write-ups and project logs from other hobbyists, to even start to understand the hardware I was going to be working with. This was also my first time working with 0402 components, and some of the parts were extremely tiny LGA package ICs, so this project would test my soldering skills as well. As I didn't have a hot air gun or reflow plate, I had to make do with my mom's trusty cast iron skillet and hope for the best.
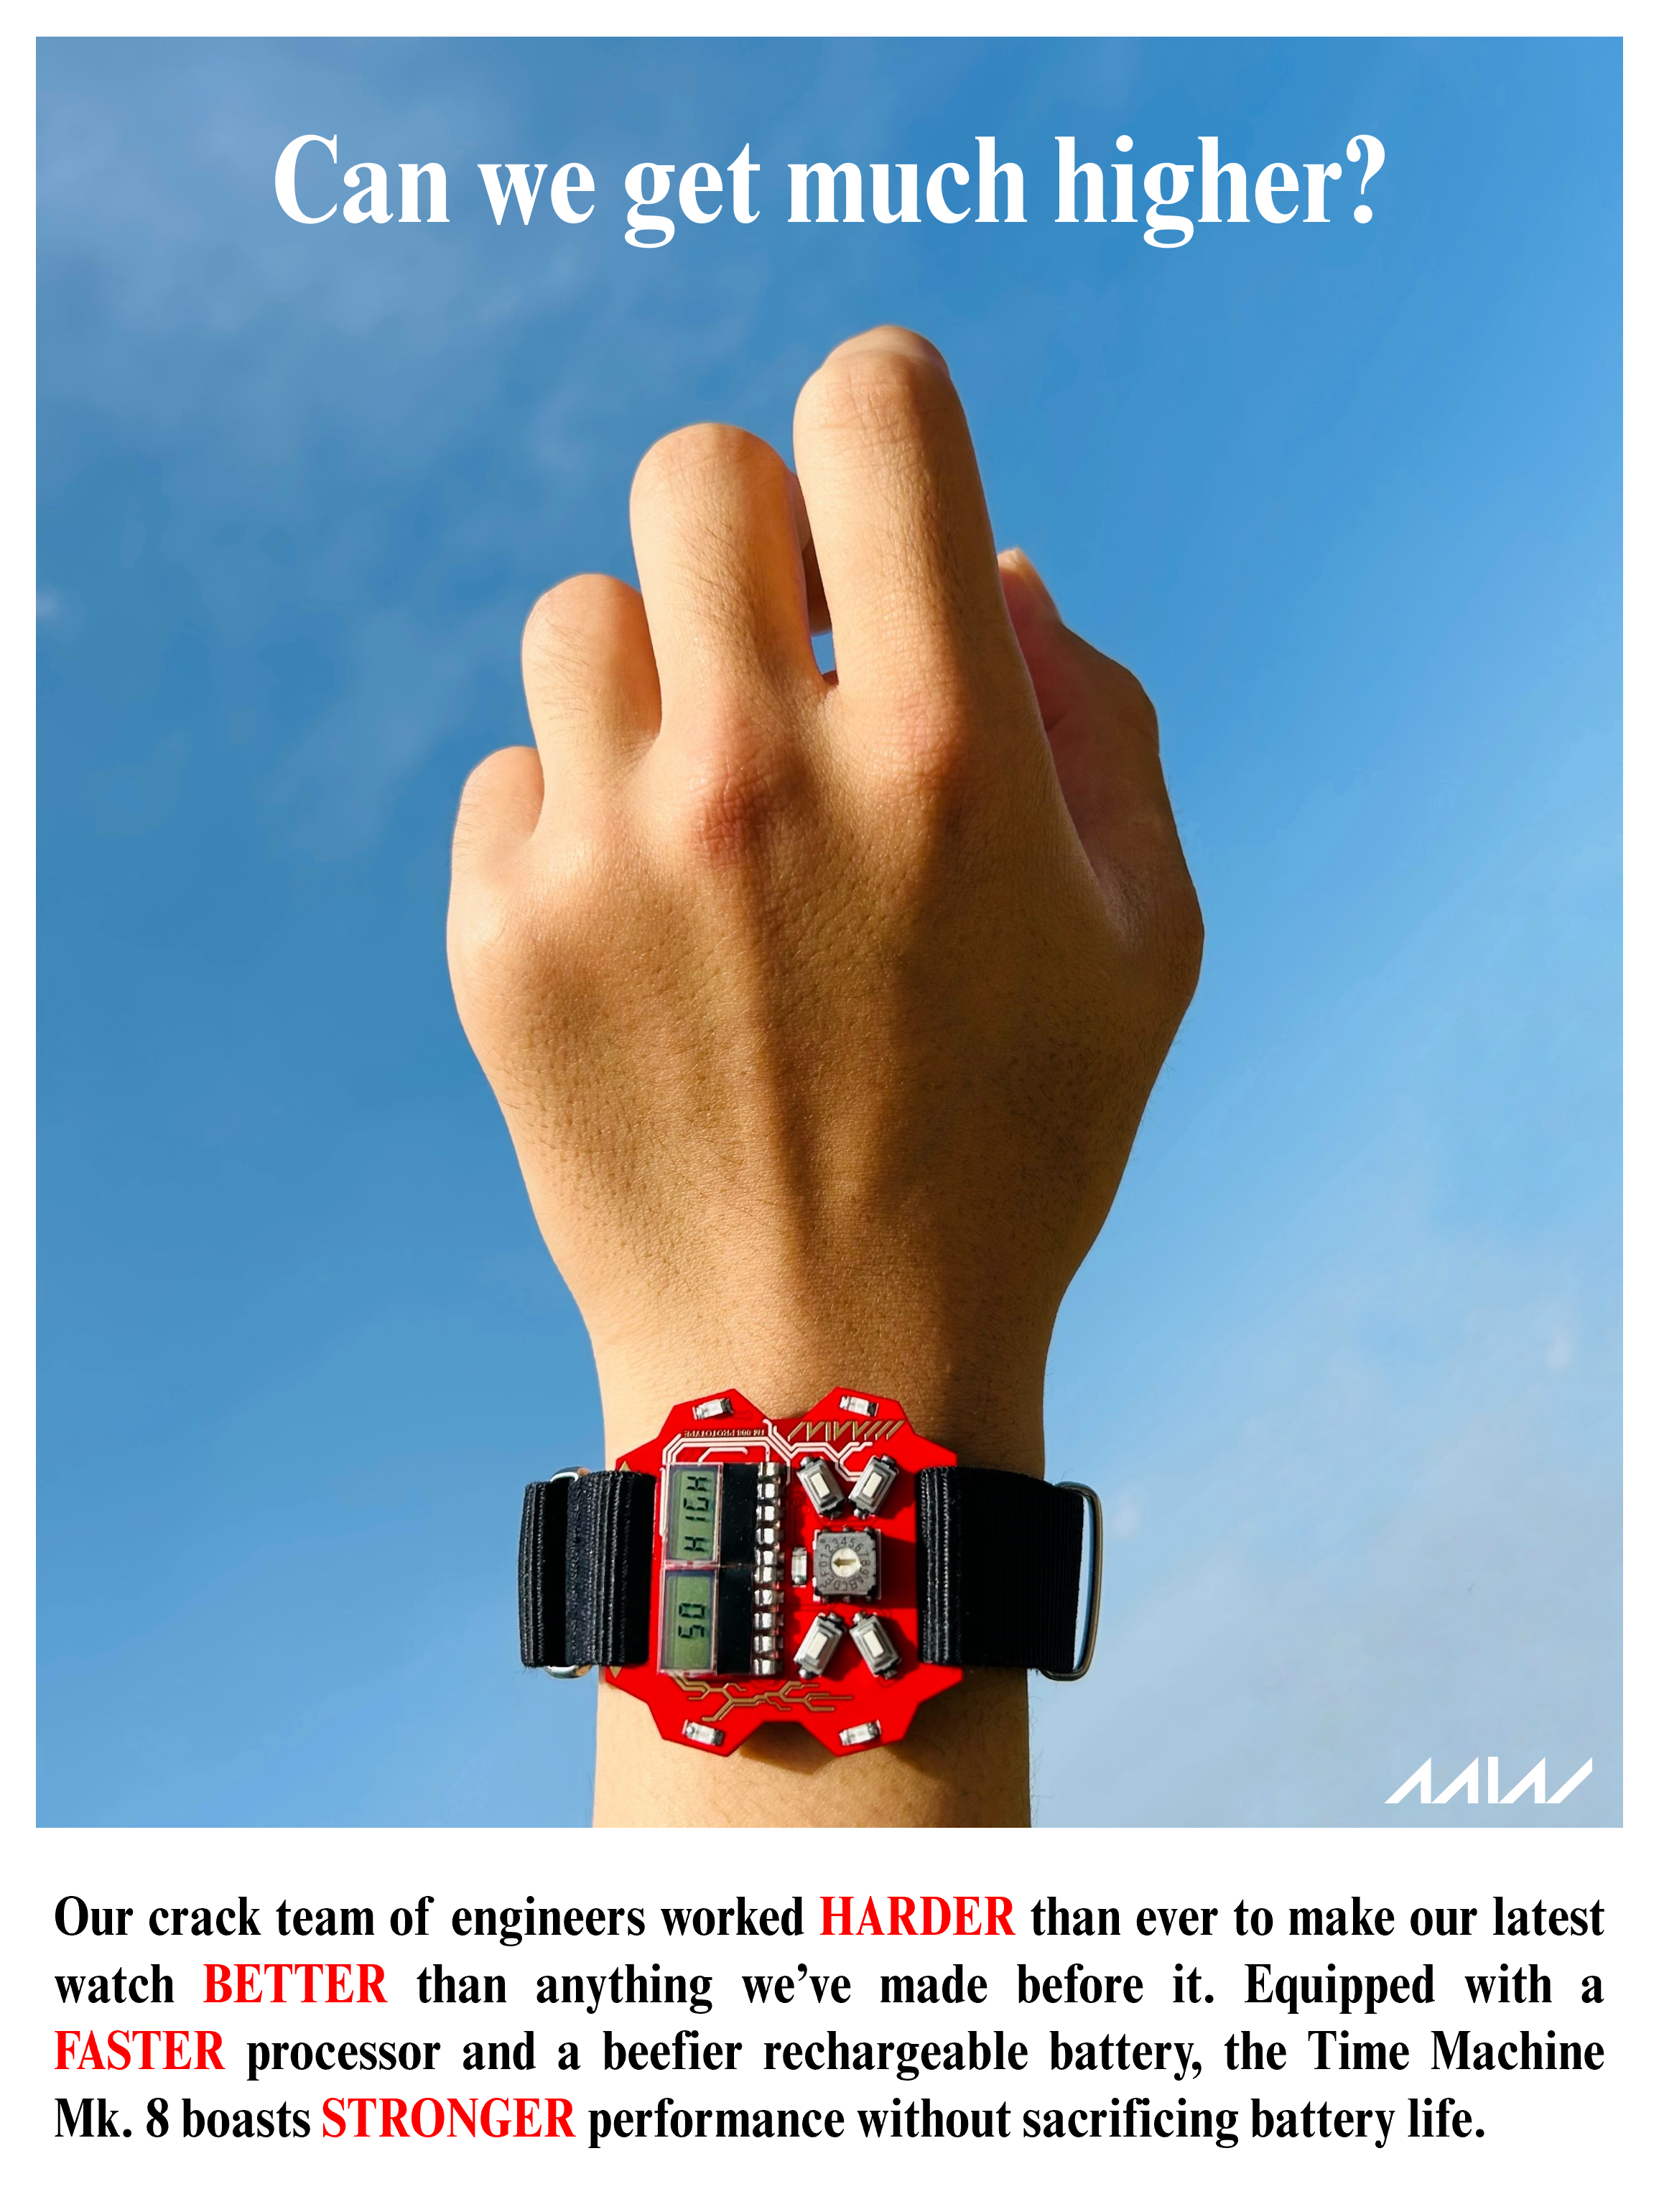
It was a tough journey, but the end product is so much more than I imagined it would be. A 41.91mm by 41.91mm watch with an 8-digit LCD display, a fully rechargable battery, and a suite of dynamic and environmental sensors. A device that could be used every day in genuine comfort while also catching the eye of everyone who caught even the slightest glimpse of it. I really baked my cake and ate it too.
◀ DESIGN ▶
FLARED FENDERS
I redesigned the fenders of Time Machine Mk. 8 to more closely resemble the angled roofline of the Lancia Stratos, my favorite classic car of all time. In fact, the whole design aesthetic of TM8 was modeled to mimic the angular, aggressive proportions of the Stratos, but the fenders were especially given extra care to be more cohesive with the rest of the watch.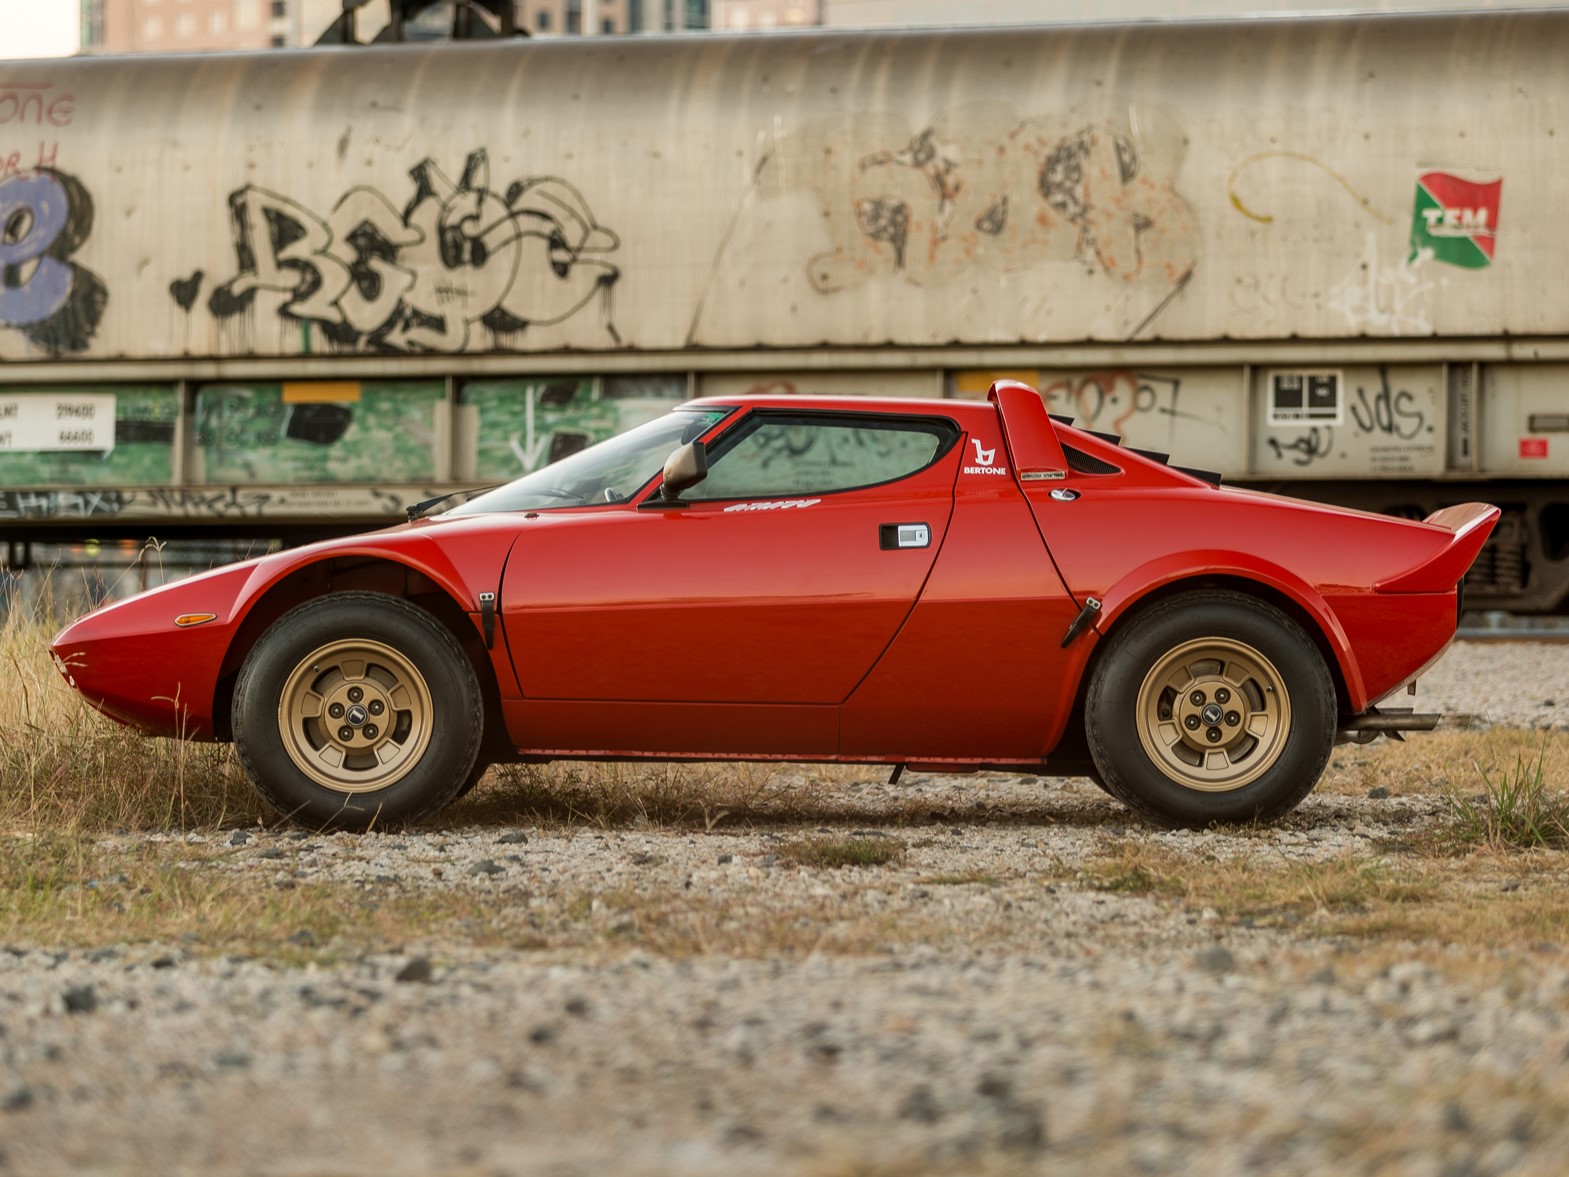

While the fenders only served as a visual design element in past Time Machine models, it serves a practical purpose for the first time on TM8. With the TM8 being my densest circuit board yet, the fenders give precious room to pack more parts and functionality on the PCB. They now house critical components including a 32.768KHz crystal, a micro USB port, and a piezo speaker. With space being such a scarcity in designing such a device, every nook and cranny of the PCB was used to its fullest.
The result is a multi-functional design element that stays true to previous Time Machines' funky design while also allowing TM8 to pack extra functonality onto its very limited space.
FRONT FASCIA


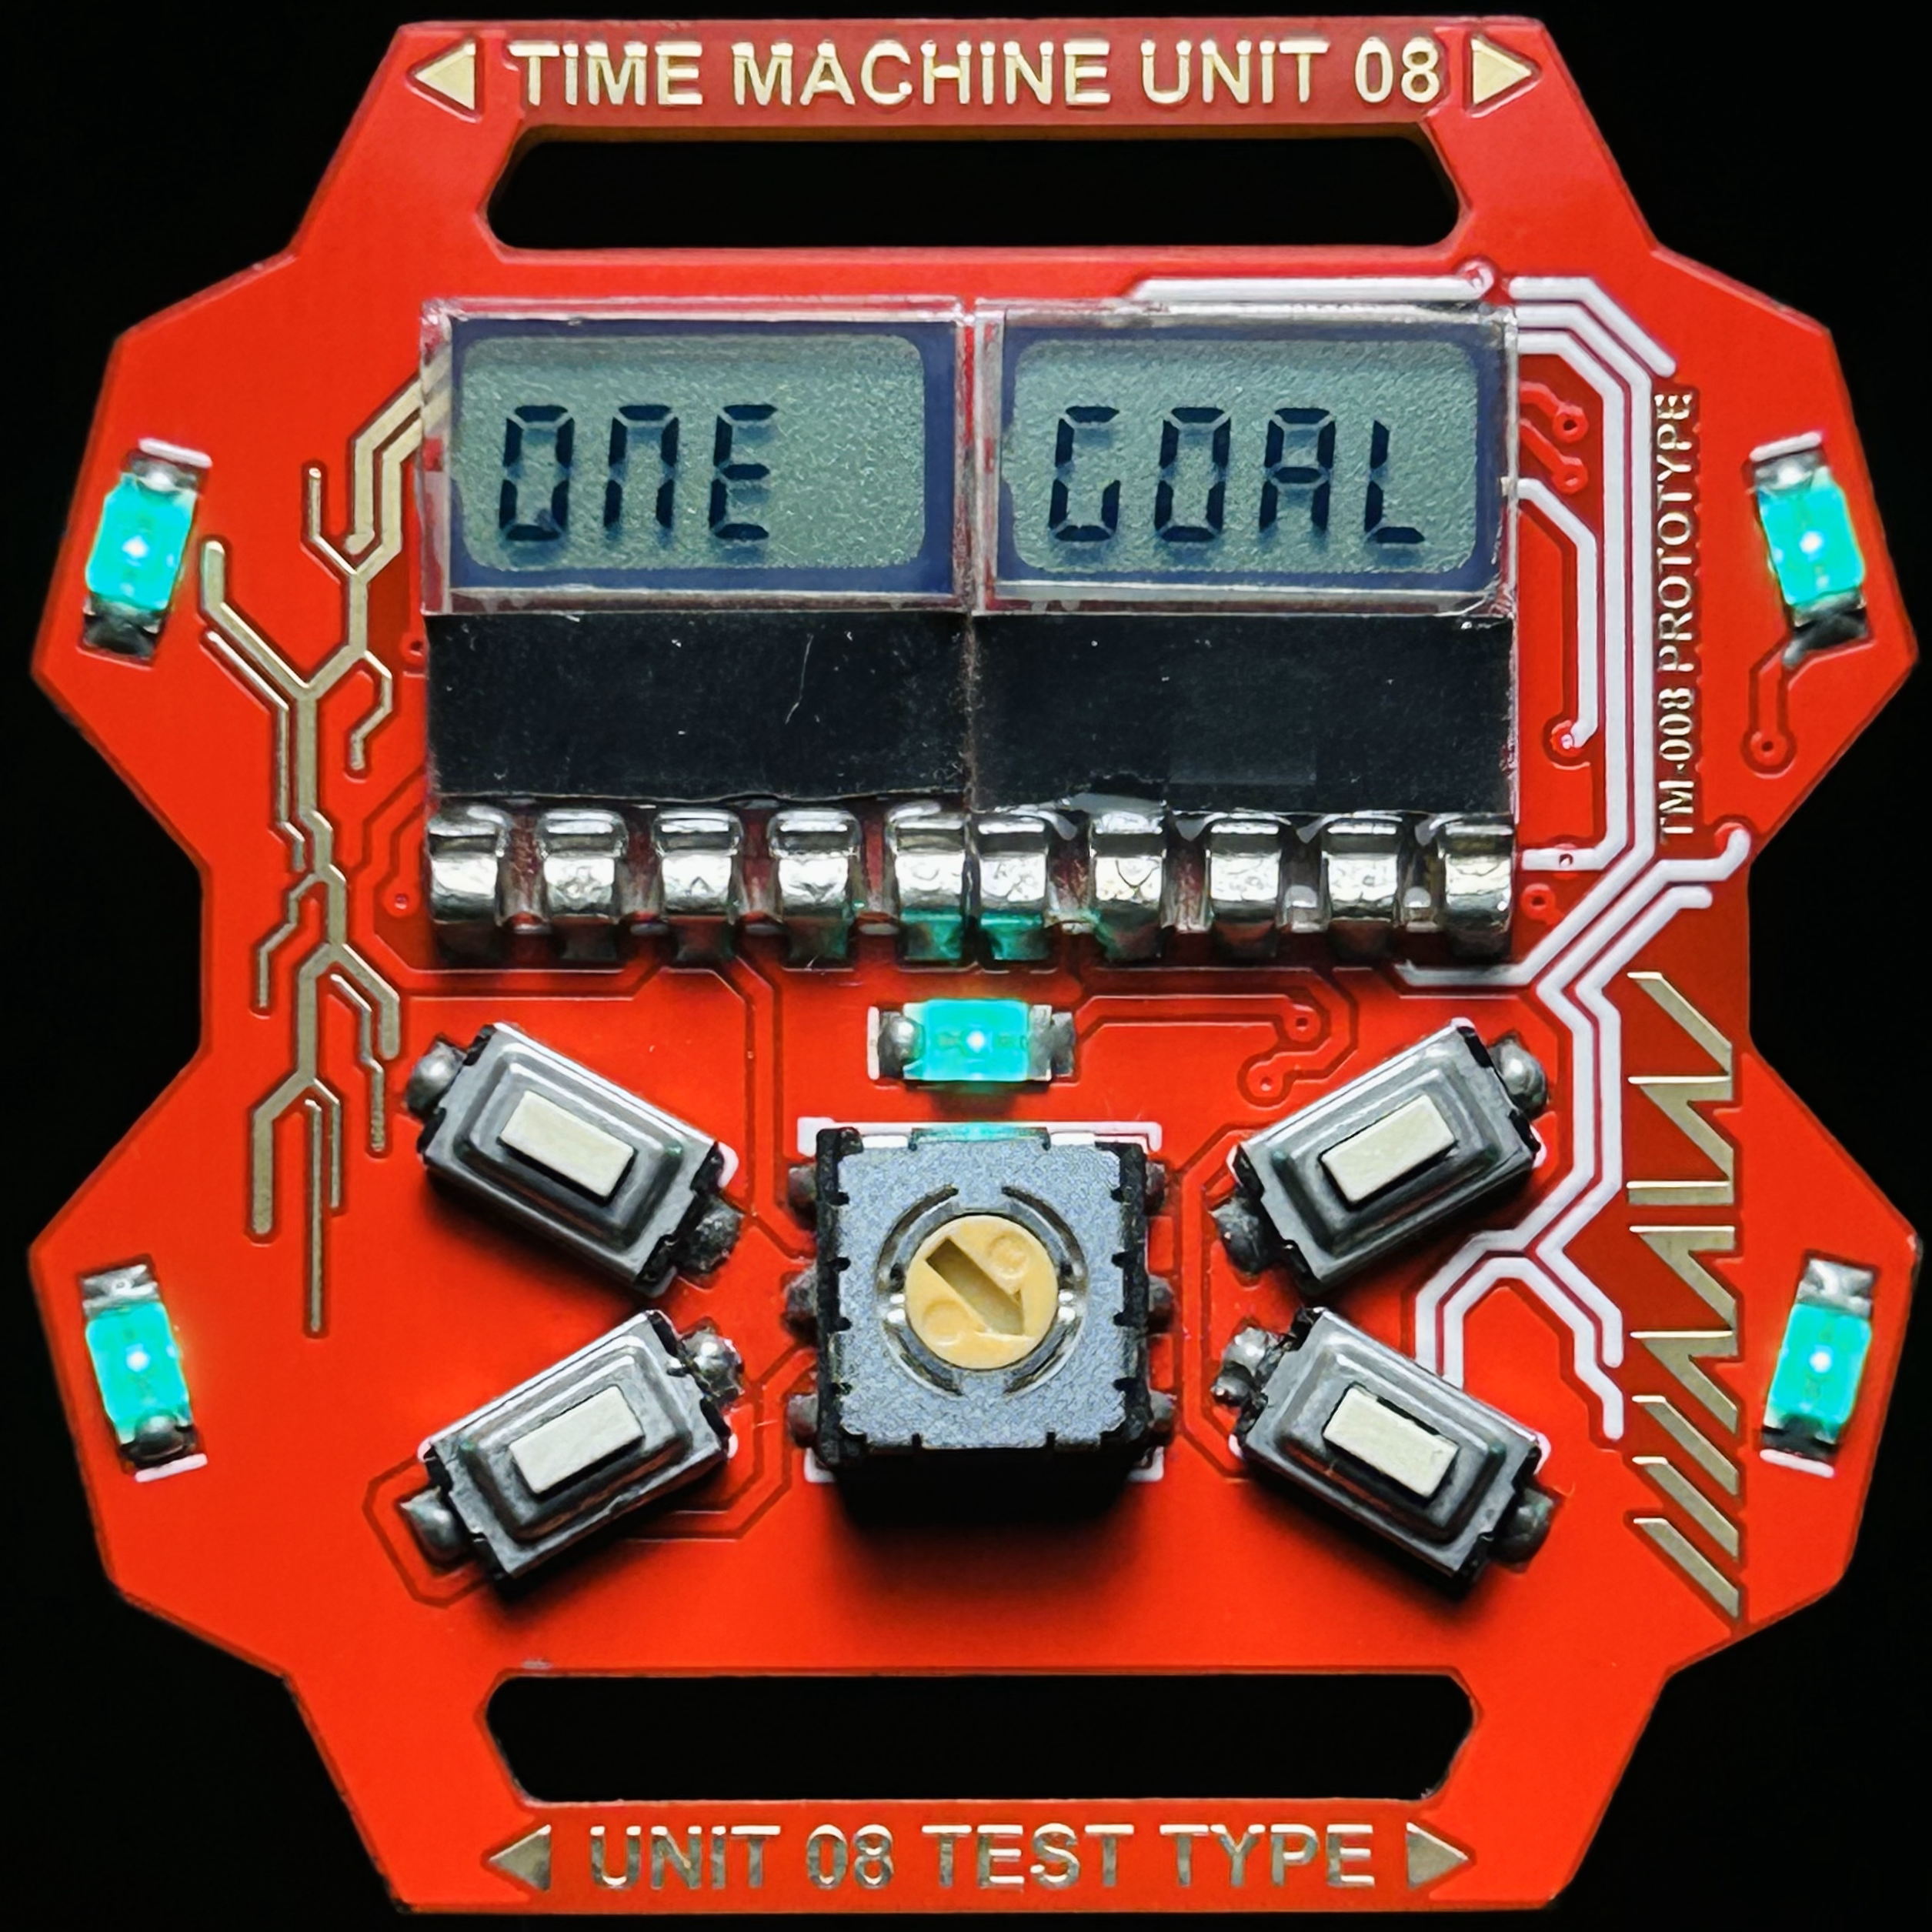
Ad for Time Machine Mk. 8, inspired by a vintage brochure ad for the R34 GT-R.
I was pretty worried I would have no room for front artwork after seeing how much space the dual LCDs took up. Usually, I have a pretty generous amount of PCB area left over at the front to add some artwork, but with the displays now taking up a sizeable portion of the width of the watch, I was pretty limited with the Mark 8. I went through countless different designs to dress up the front with. I initially tried motorsport inspired designs such as racing stripes and roundels, but for a while it seemed like I had no answers. I just could not find a design that worked well within the relatively small space left by the components. However, I eventually landed on a funky "Thunder and Lightning" design that I felt worked incredibly well with the overall design aesthetic of TM8, and I ran with it. After several more tweaks and revisions, the resulting design is something I could not possibly be more happy with.
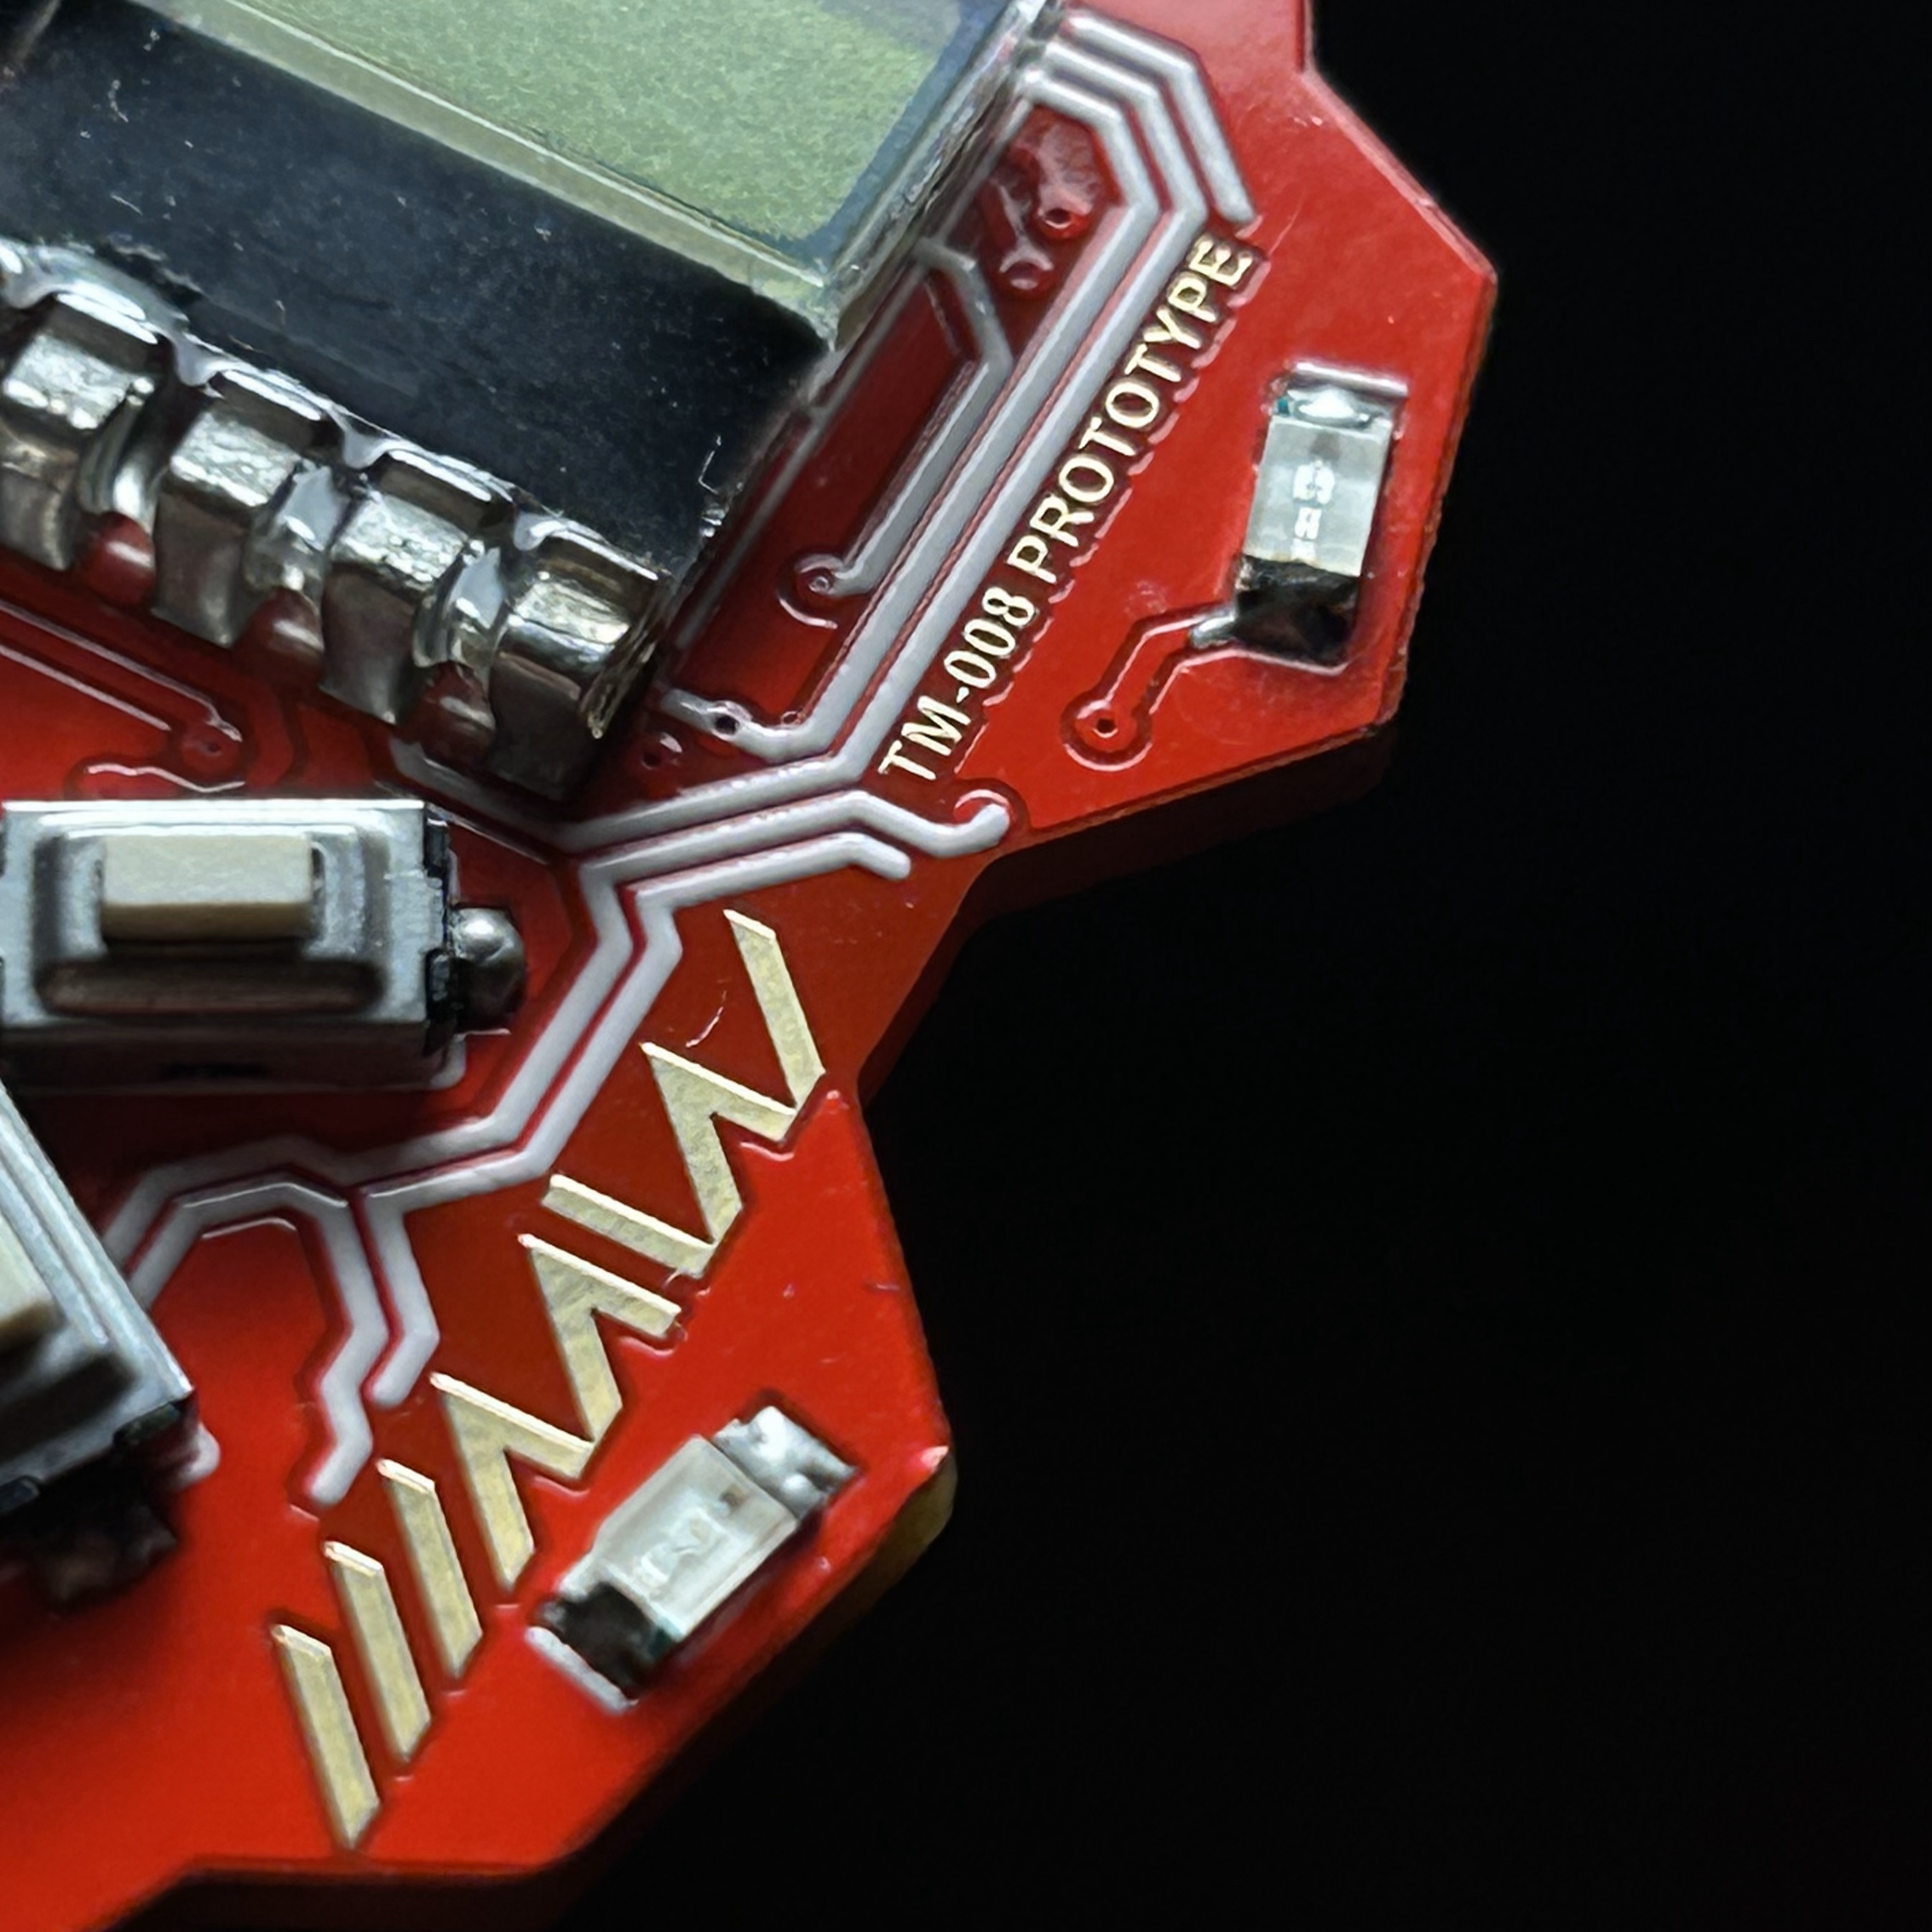
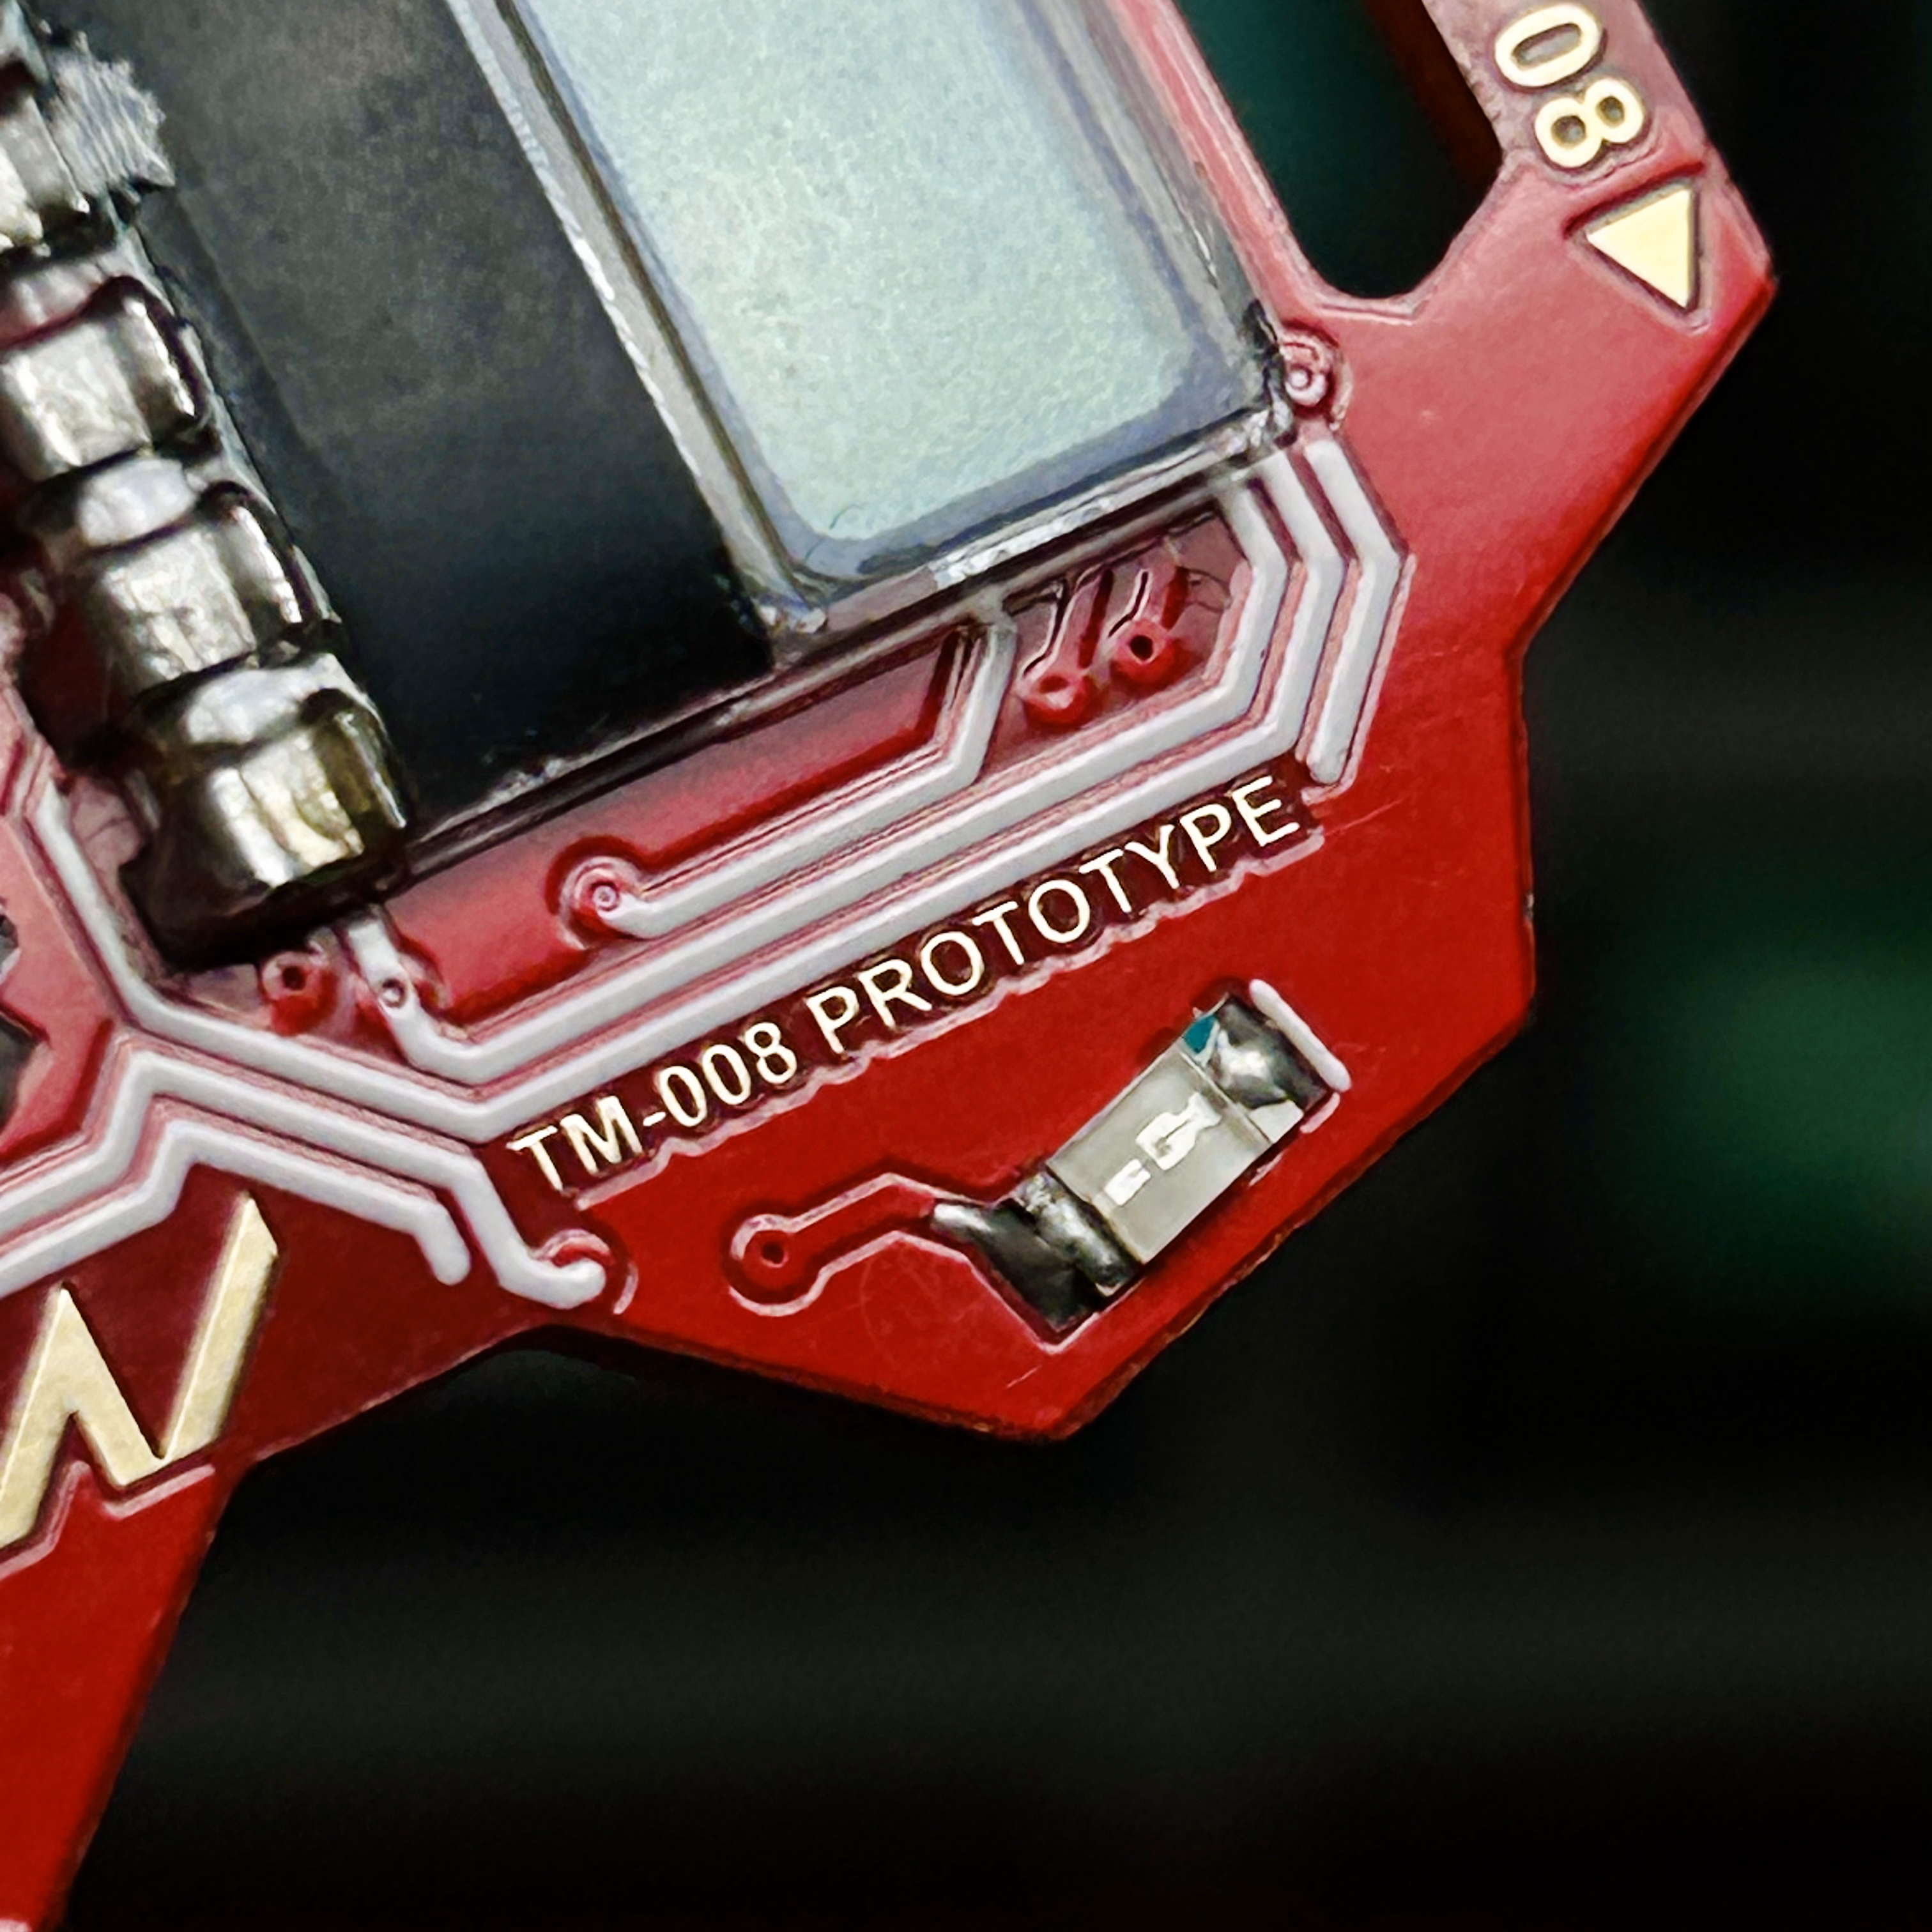
With Time Machine Mark 6, I was toying around with the idea of having exposed copper traces, which gave a neat futuristic cyberpunk look. The design on TM8 is an evolution of that. While I initially intended to again run with exposed copper traces like I did on Mark 6, I quickly realized it might cause the traces to short with each other. So, I kept all traces protected under soldermask, and instead lined them with silkscreen, which I think gives an equally cool effect. I experimented with this design direction, trying numerous variations deciding which traces to line with silkscreen and which to keep red, and ended with a design that was visually striking but also neatly incorporated the small "TM-008 PROTOTYPE" script on the top as well as my logo on the bottom. Also, the lightning bolt-y shape was not really intentional, I just happened to realize later in the design process that it looked like one, which led me to design complementing artwork on the left side, the "Thunderbolt."

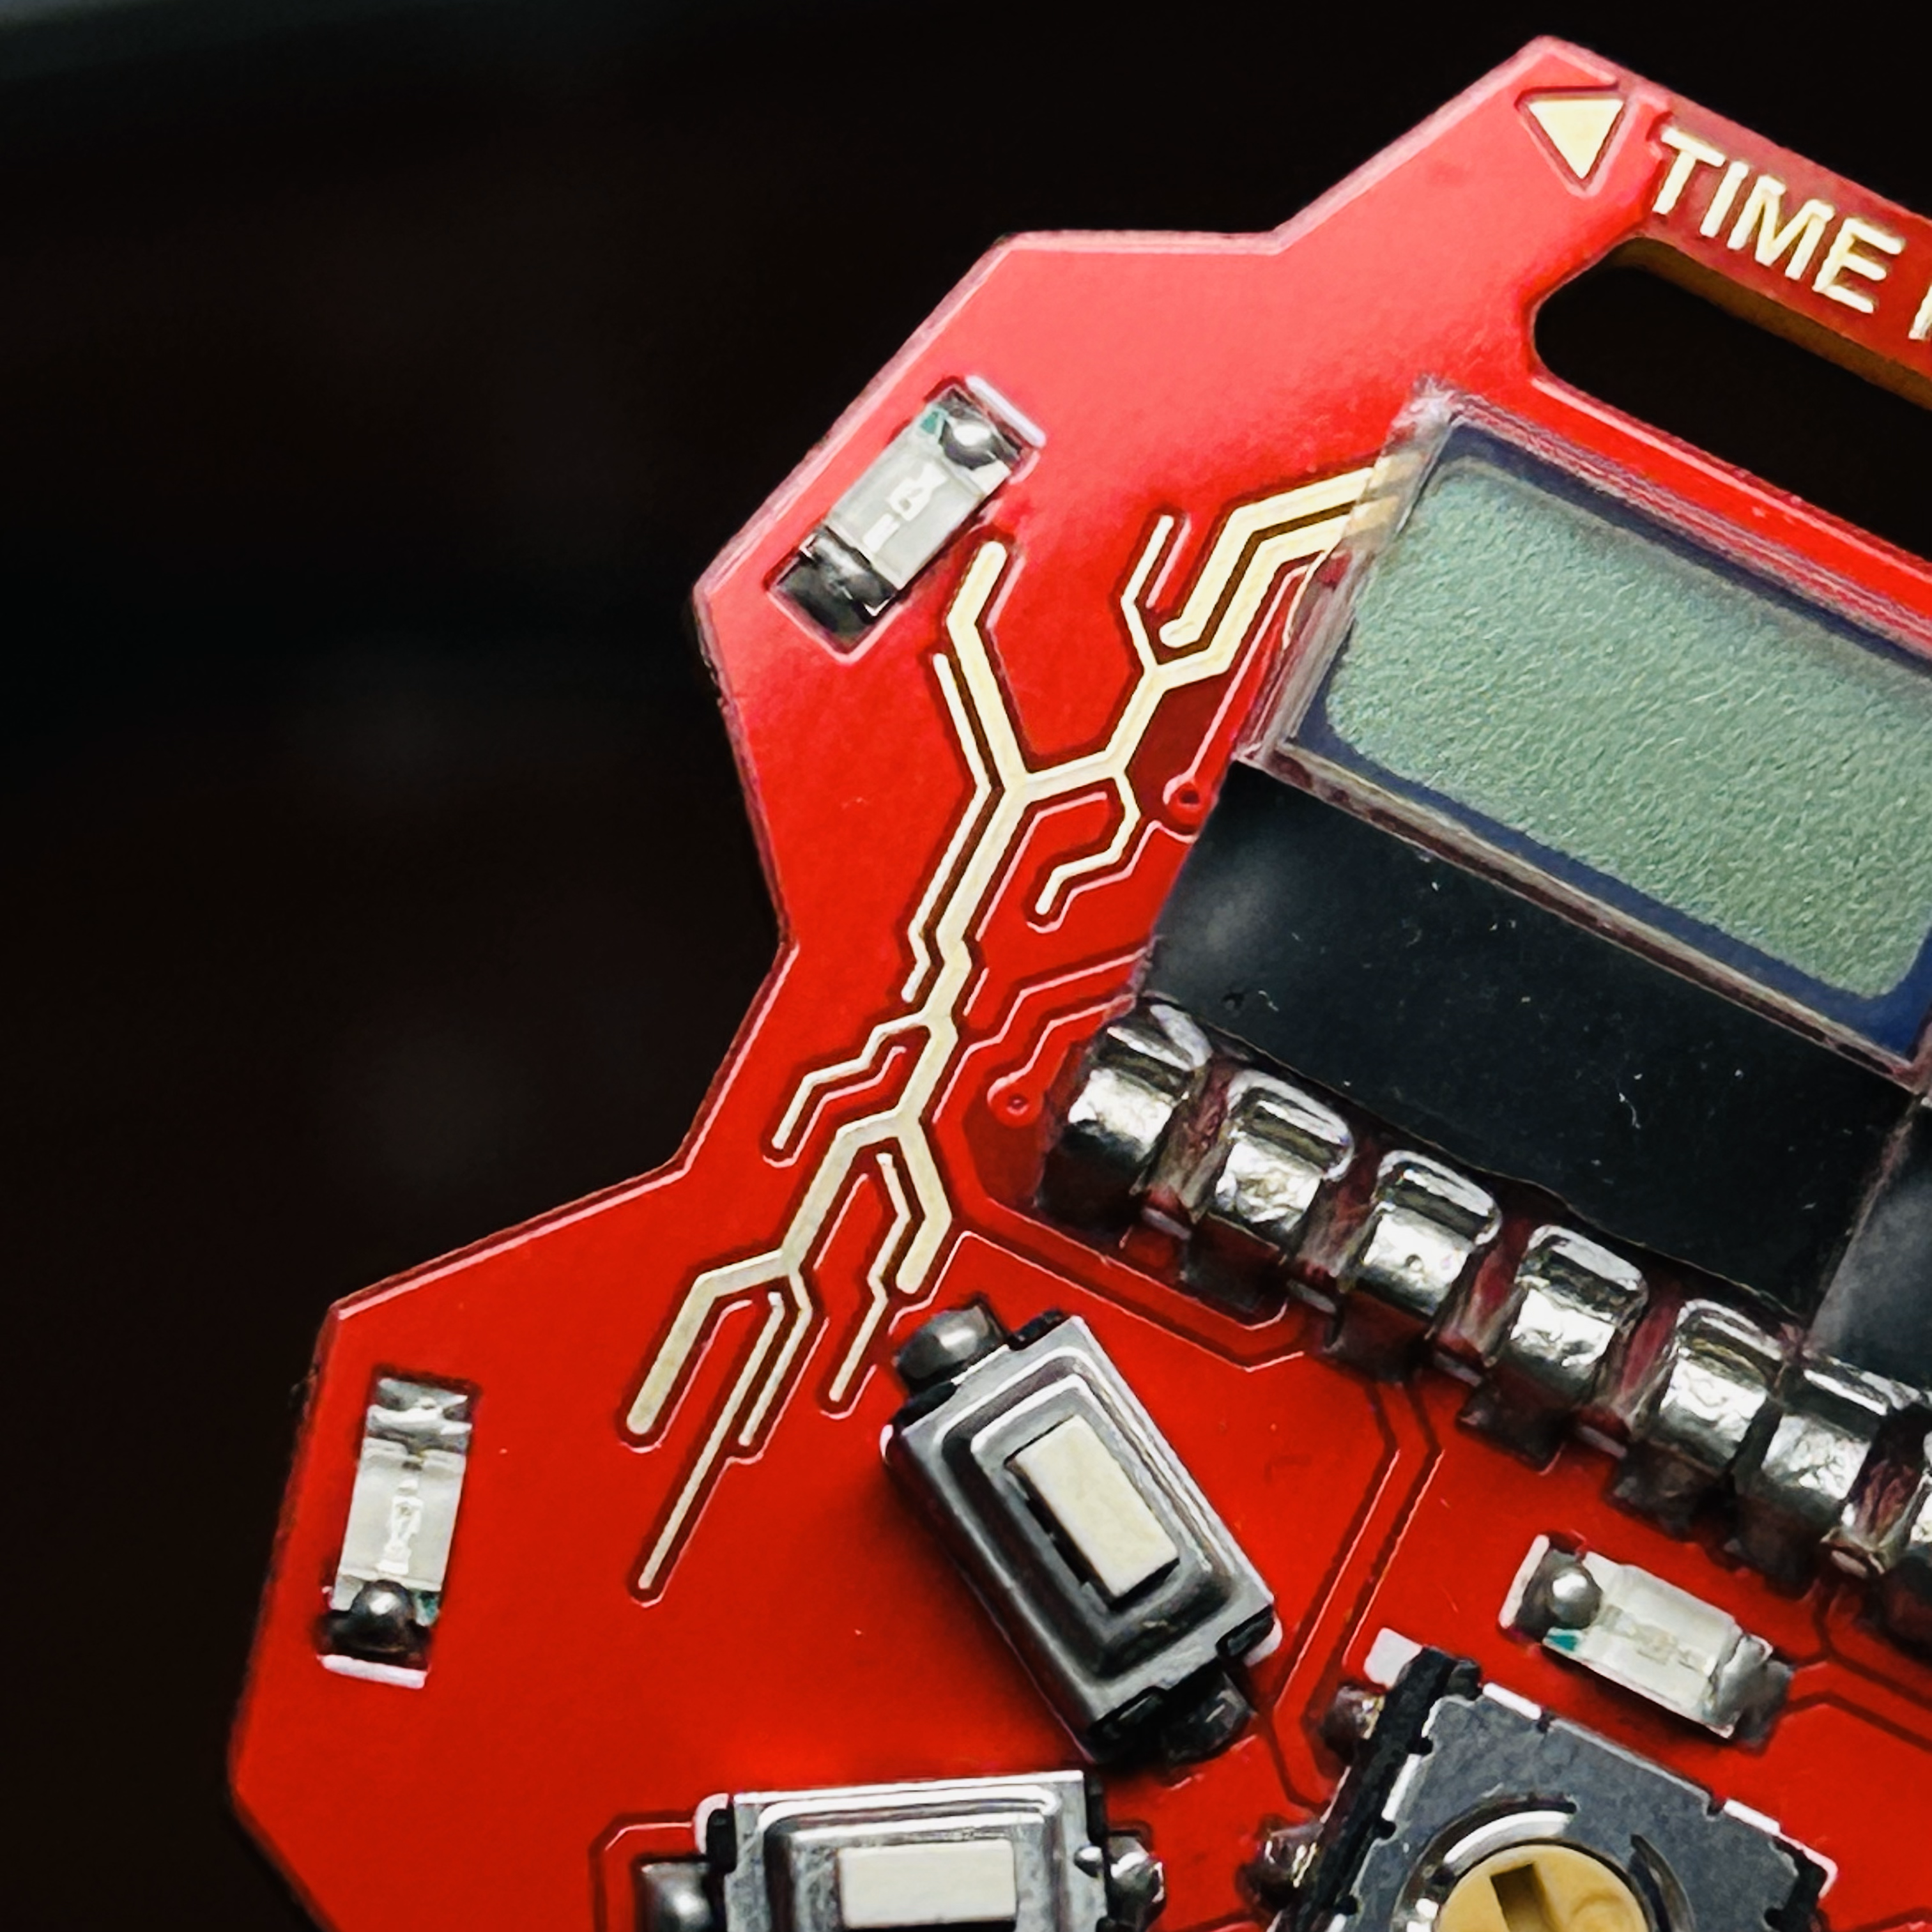
The "Thunderbolt" part of the front artwork was a slightly different story. I actually have no idea why or how I ended up with such a design. All I know is, I was dicking around with the trace tool on Eagle, trying to get whatever random design I could out from my head and onto the screen, when I realized the left side of the front fascia, with its silk-lined signal traces, sort of resembled a lightning bolt. I didn't really have any better options at that point, so I just ran with it to see how well it would fit in my design, and it actually took less tries than I thought to get a design I was happy with. So from there on, I simply added minor tweaks here an there, until I ended up with the design I have here.


AESTHETIC
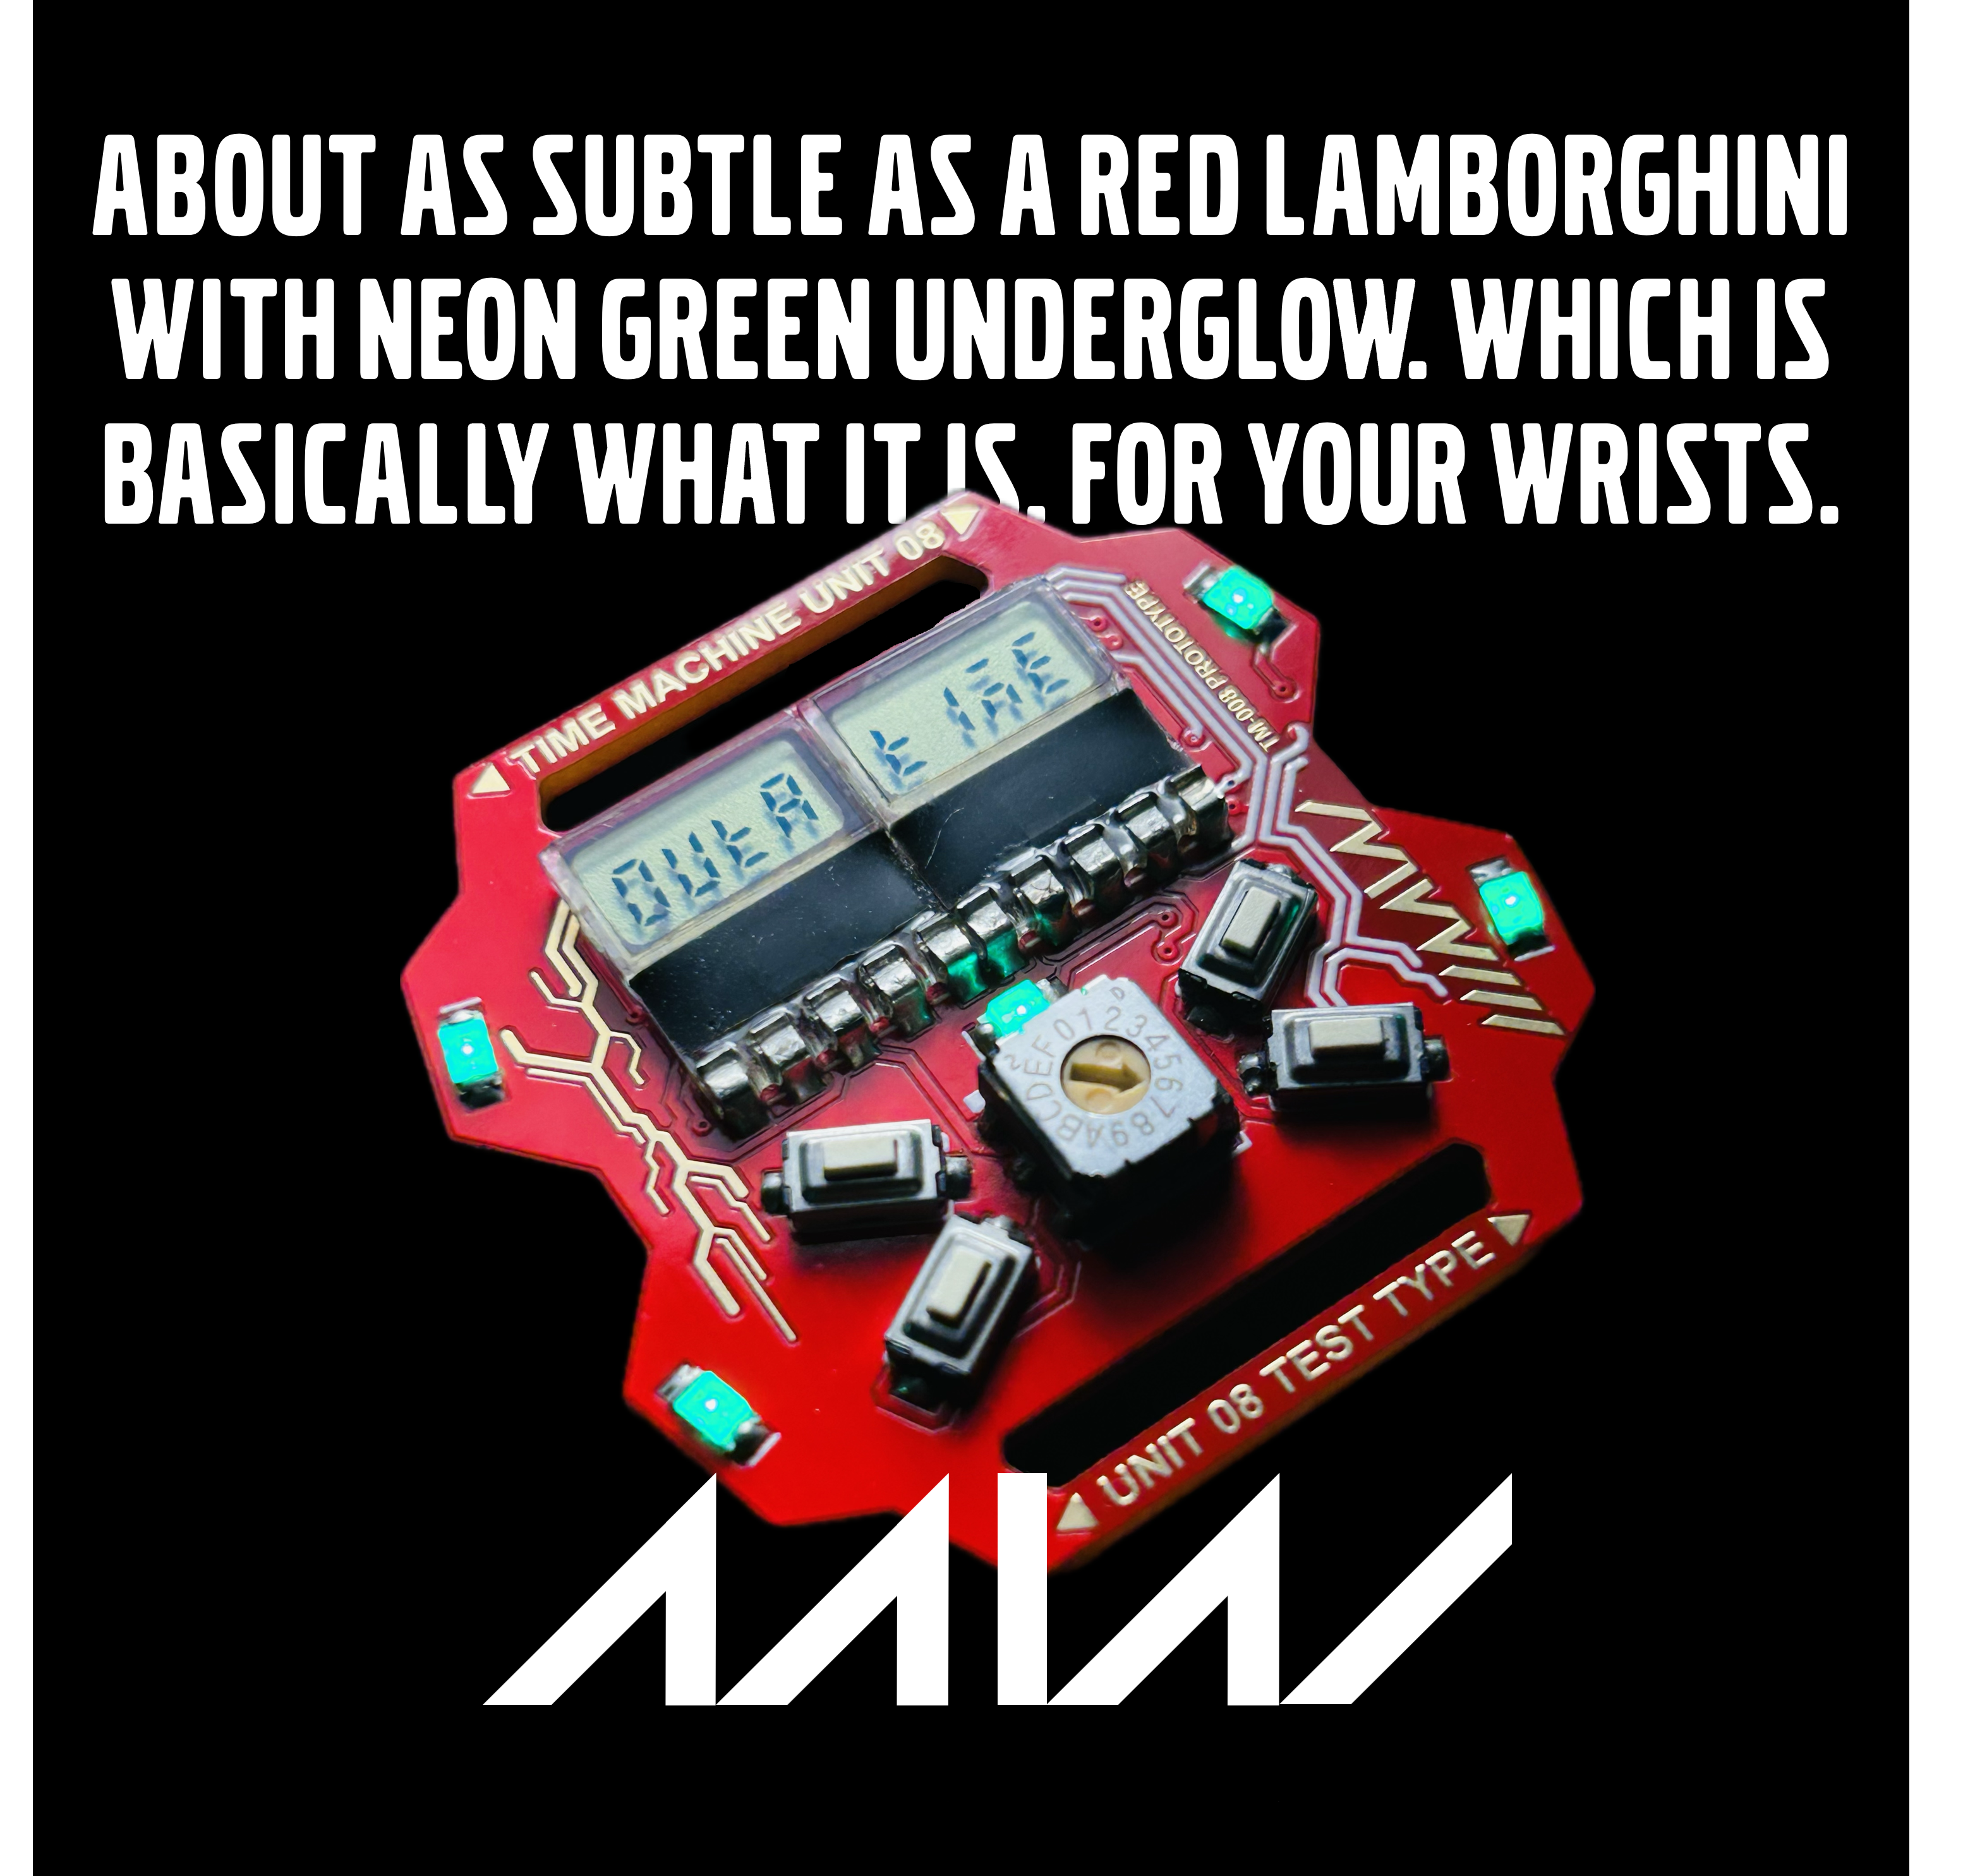
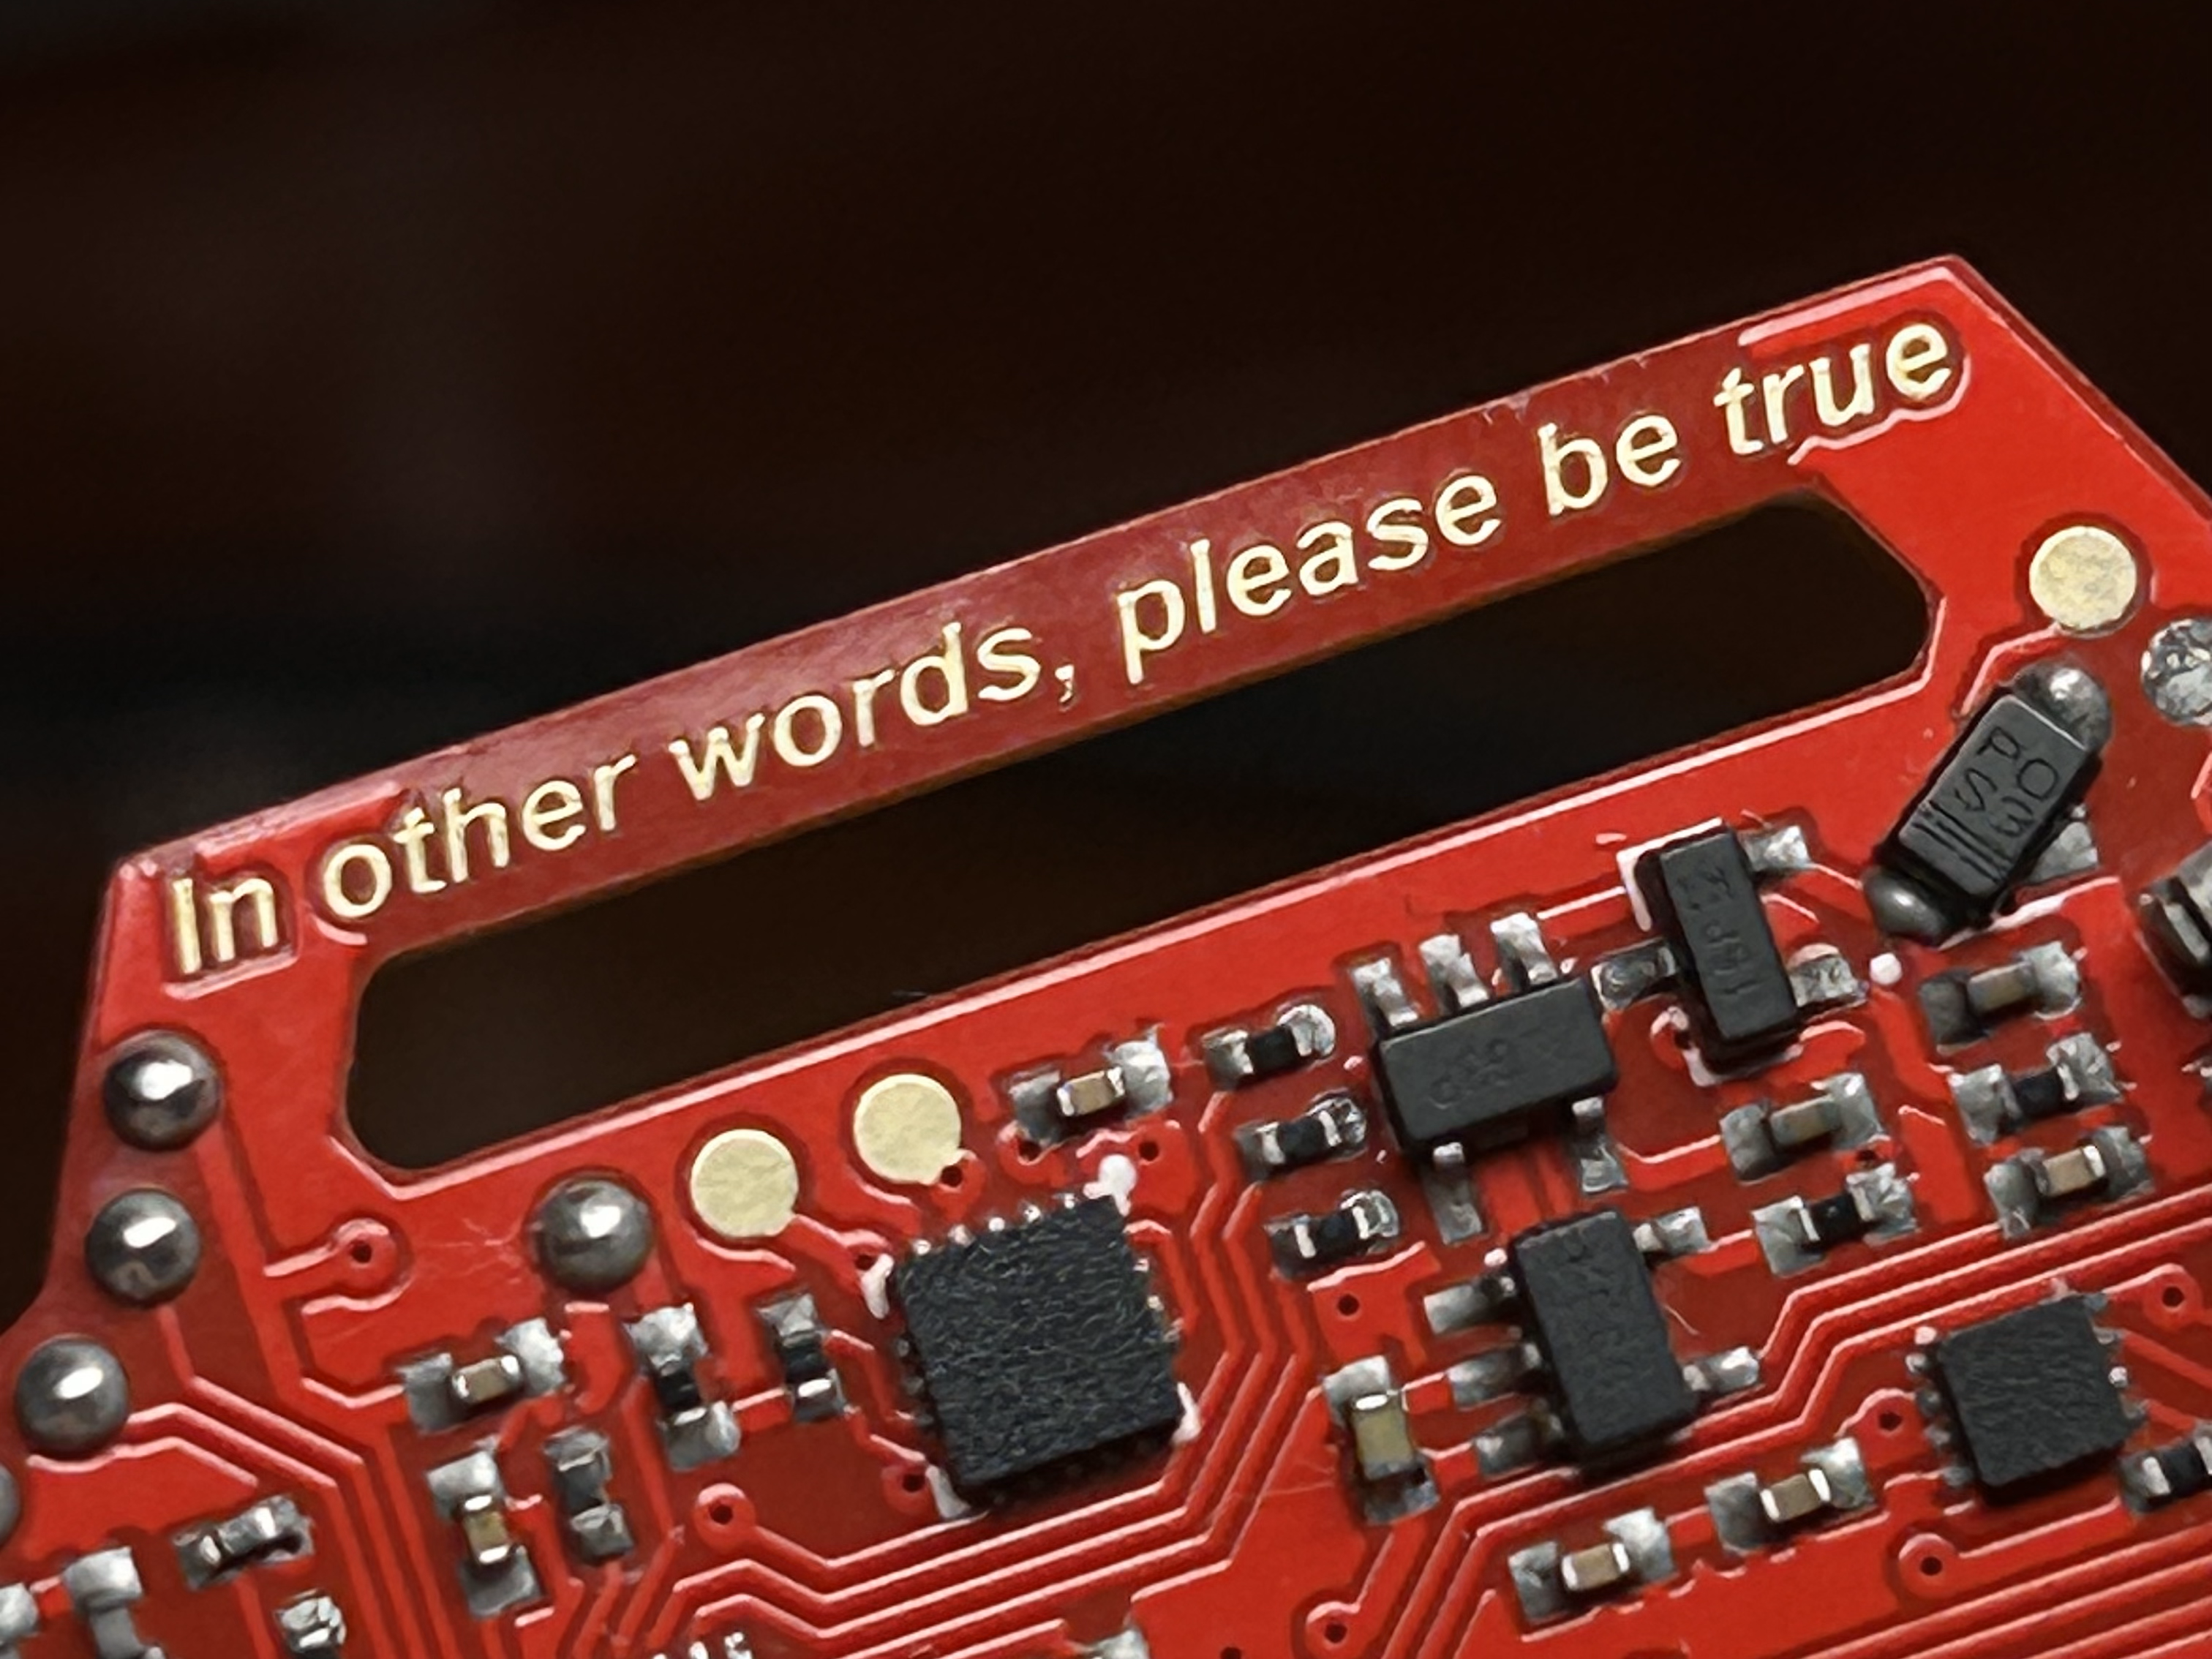
The Time Machine Mk. 8 is inspired by the things that inspire me; Formula One, cars, Neon Genesis Evangelion, and Akira, to name a few. The copper print on the lugs are inspired by Evangelion, as well as the very small "TM-008 PROTOTYPE" script on the top right corner of the front fascia. I especially love the Frank Sinatra lyrics at the backside, which of course, is also a reference to Evangelion. The general design of the front side was inspired by Formula One steering wheels from the late 2000s/early 2010s, with the display on top, a giant knob in the center, flanked by switches on either side. The LED placement, carried over from Time Machine Mk. 4, was inspired by Iron Man's Mark 46 suit, with its central chest RT and smaller Arc Reactors studding the suit. If you look closely, some of the smaller Arc Reactors are angled, which led to my LEDs being angled as well. The LEDs were chosen to be green, an homage to Kaneda's bike in Akira, possibly my favorite fictional vehicle.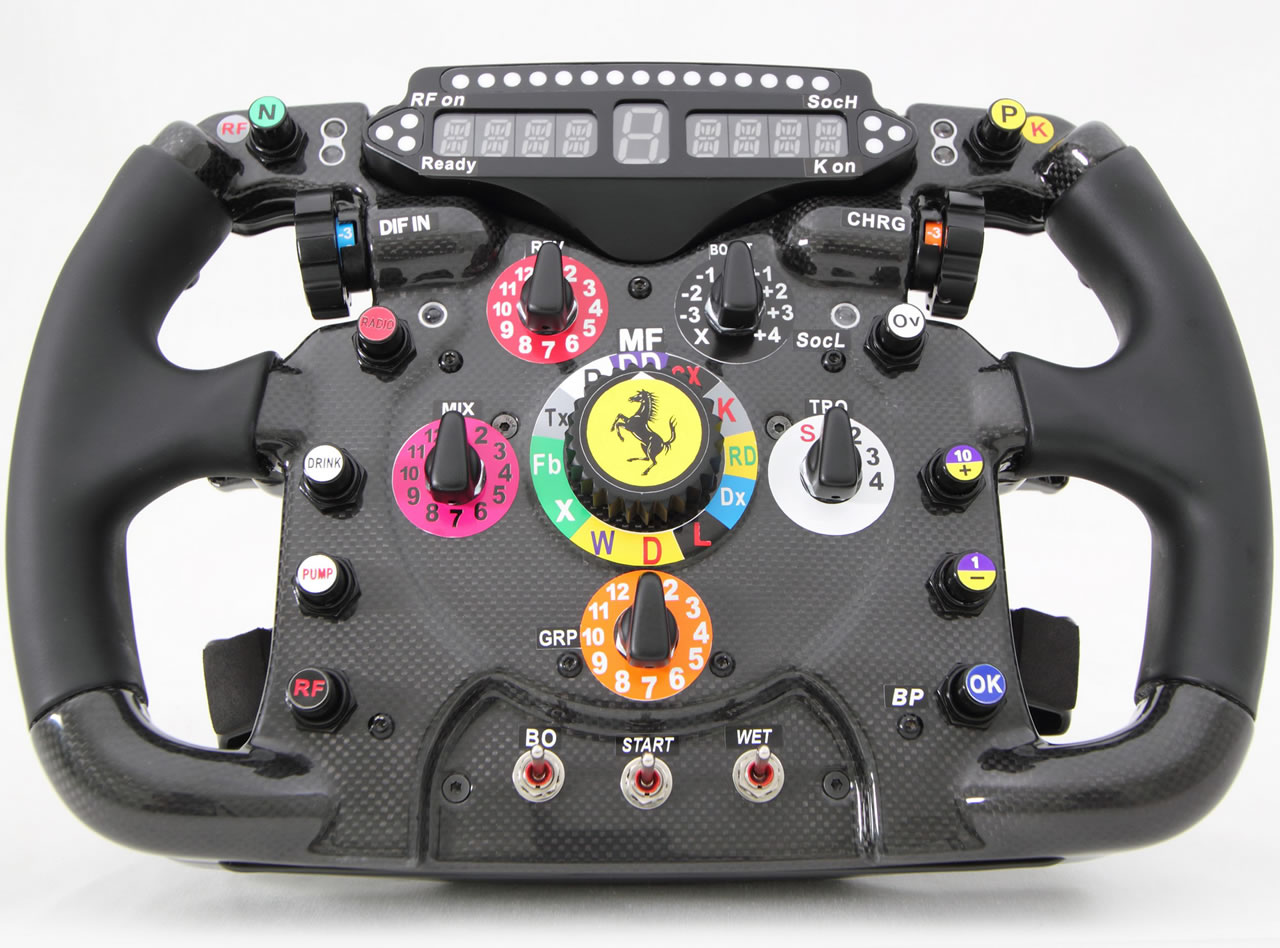
One of the bigger challenges when designing TM8 was to make it striking, but not necessarily too busy. Now, styling and design is very much a subjective matter, and I assume there will be plenty who disagree with me, but I think I nailed the design. Obviously, I'm extremely biased, but I think I treaded carefully the line between "attention grabbing" and "overstyled." Think more Koenigsegg, less Pagani. At the time of writing(12/25/2023), I've been dailying Time Machine Mk. 8 for the past six months, and It's gotten a lot of attention from strangers. People often ask what the hell that thing on my wrist is, and when I tell them it's a watch, they then comment on the design, always positively. It truly makes all my work worthwile, and more.
◀ HARDWARE ▶
Ad for Time Machine Mk. 8 inspired by Kanye West.
I'm a strong believer that great hardware is responsible for great software; I always kept this in mind when designing Time Machine Mk. 8. I wanted firmware development to be as easy as possible, which meant I had to pay careful attention to each and every component I chose. I had to use proven components already used in open-source projects with well-documented examples. I knew this project was going to take quite a hit on my wallet, so I wanted to get things right the first time. Thankfully, I was able to get invaluable resources and reference designs from the likes of Adafruit and Sparkfun, with their already well-established lineup of hobbyist-friendly hardware and software.
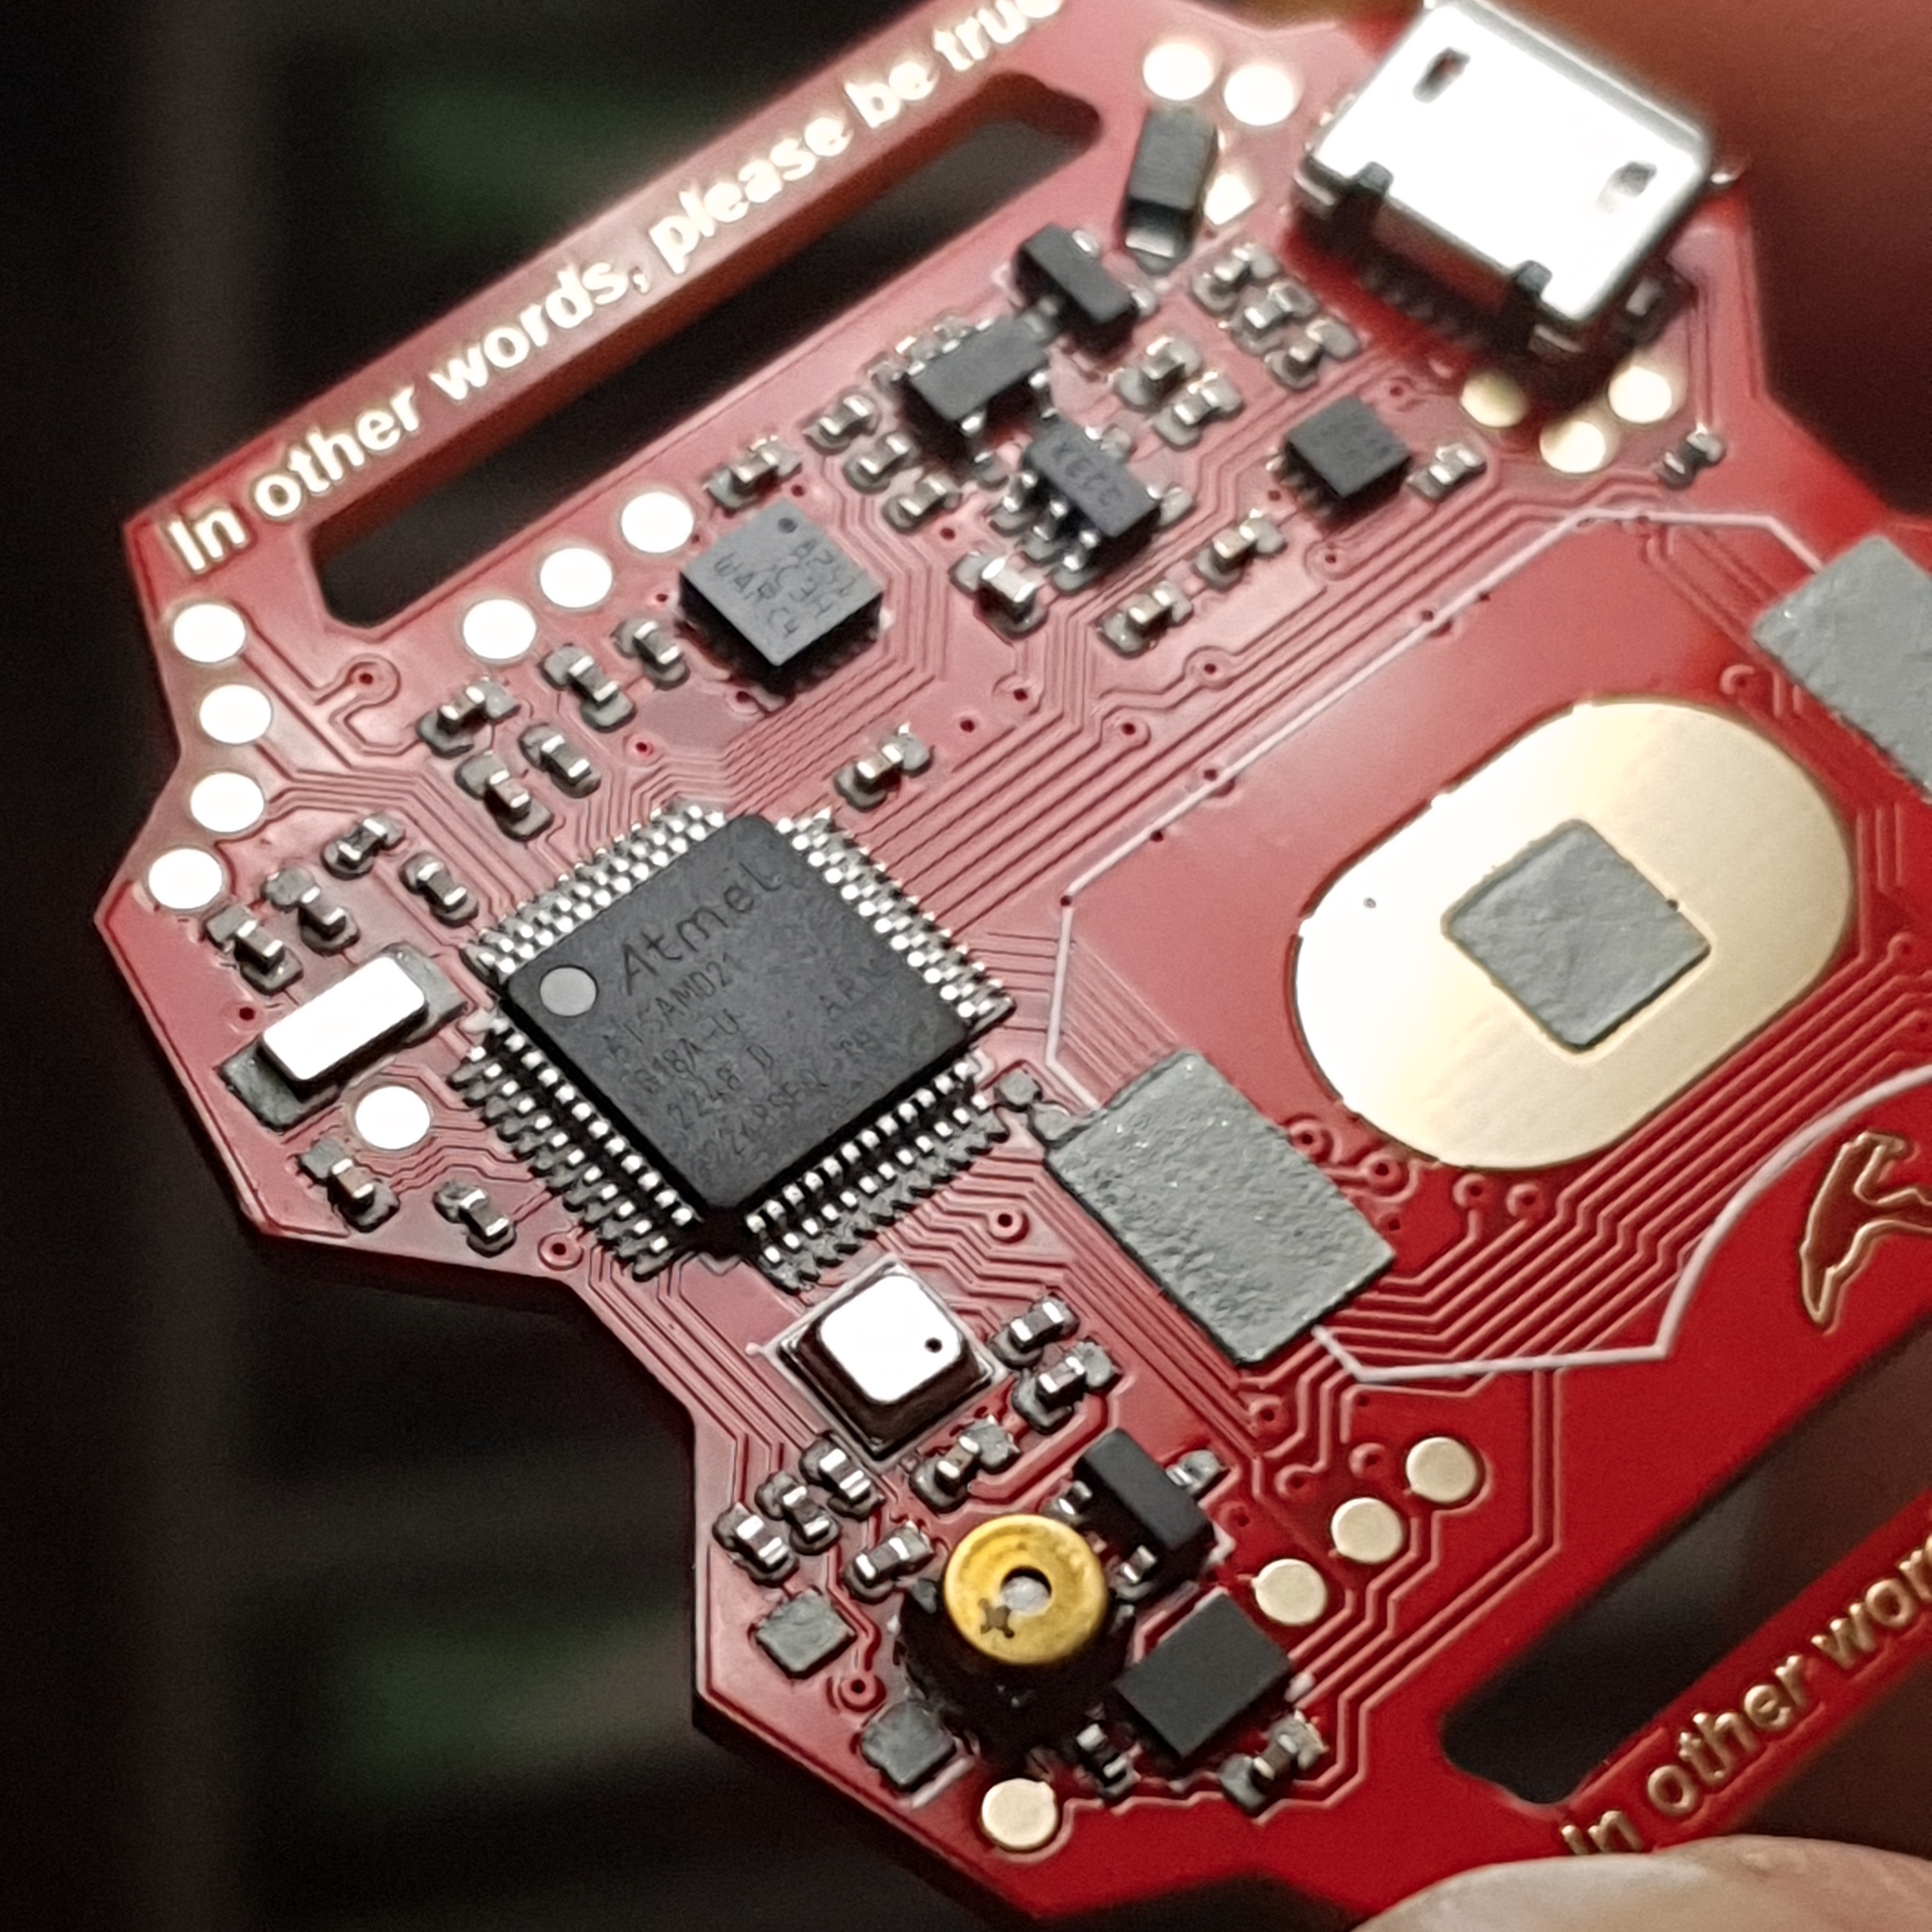
ATSAMD21G18A-AU
At the very beginning of the design phase, I had a lot of trouble choosing a microcontroller for the project. I constantly went back and forth between the NRF52, ESP32, and ATSAMD21. I eventually chose the SAMD21 as I felt it struck the right balance between power consumption and horsepower. Also, the SAMD21 had native USB, which later became a requirement for the project once I realized how much extra functionality that would add to TM8. While the ESP32 had native USB as well, I felt it had too many bells and whistles for my needs. However, now that I've finished building Time Machine Mk. 8, I think the ESP32 will be a great replacement for the next Time Machine.The more I worked with the SAMD21, the more I started to fall in love with it. Whenever I found myself needing an extra peripheral for TM8, whether it be a conveniently placed PWM pin or an extra I2C port, the SAMD21 had one ready. Plus, the excellent reference designs from Adafruit and Sparkfun were monumental in helping me design the base hardware, and the strong popularity and community support from other hobbyists helped write the firmware.
One of the SAMD21's most powerful features are its SERCOM ports, essentially reconfigurable hardware communication ports that can be assigned to be either UART, SPI, or CAN. This proved extremely useful as it allowed me to route a second I2C bus to anywhere I wanted to from a wide selection of pins, optimized for efficient routing on the tightly packaged backside of the watch. This made routing a whole lot easier as it saved me a lot of time that otherwise would have been spent on deciding which pin will do what and where.
Another neat peripheral was a built-in RTC. While this peripheral is quite common on most 32-bit microcontrollers today, it is still a godsend as it allows the micro to manage other tasks while keeping time in the background. The RTC peripheral even operates under standby mode, the lowest power mode the SAMD21 had to offer. This saved a lot of headache when incorporating low-power modes into the firmware.
CDM4101 LCD
Choosing and sourcing the right display also caused many headaches, as I struggled to find one that provided my desired information density while still sticking to the Time Machine Mk. 8's retro-futuristic aesthetic. I considered everything from 64 x 48 OLED displays to LED dot matrices. It was less that I had too many options to choose from, but more that I had nothing that satisfied my needs; I knew exactly what I wanted and the existing options were none of those. One day, I stumbled upon Mohit Bohite's awesome wire frame circuit sculptures, which used small 4 digit 7-segment LCD modules that communicated over I2C. I actually did not consider using these at first, as I was not a fan of the huge black rectangle underneath the LCD that covers up the driver IC. However, the simplicity gained from a built-in driver chip, as well as the immense low-power efficiency of LCD technology, was too hard to ignore, and ultimately I selected these.I'll be honest, I'm still a little bothered by the black boxes. My ideal display would be the same LCD, but with the drivers mounted underneath the LCD glass to make it half as long. But aesthetics aside, these tiny LCDs really deliver. The built-in drivers do most of the work, even allowing me to set the display and set the microcontroller to sleep mode, almost exactly like a Sharp memory display. All this while consuming no more than a few microAmps. No other display would have even come close to its ease of use, versatility, and power consumption.
While the LCDs came from the factory as through-hole modules, I needed them to be soldered on as surface-mount devices. So, I cut their legs short, then bent them inwards and underneath the modules, like J-lead SMDs. I was also pleasantly surprised to know most of the LCDs' thickness came from a plastic material stuck under the display glass that acted as a diffuser for an optional backlight LED. To make TM8 as thin as possible, I removed the diffuser and instead mounted the LCDs directly on the PCB. I then snuck small RGB LEDs under each LCD to act as a backlight, as well as 10k Ohm pullup resistors for each of the I2C buses under each LCD.
That brings us to the I2C situation on TM8. One downside of the LCD was that they all shared the same I2C address, which I guess was hard-wired along with the driver IC in the manufacturing process. This forced me to use two I2C buses, one for each LCD. This is where the SAMD21's SERCOM peripheral saved the day, as I was able to set up a second I2C port, its pin placement optimized for efficient routing. This took care of things nicely, and writing firmware to manage both I2C buses was relatively straightforward. In fact, I might even say the use of two I2C buses even made my life easier in some parts, as I wasn't forced to route all the other I2C devices on the watch to a single bus; I was able to just connect devices to the bus closest to it, which saved a lot of headache and routing woes.
FRONT I/O
The front of the watch was inspired by Formula One steering wheels from the early 2010s. Segmented display on top, with a giant rotary knob in the center, flanked by buttons. As per Time Machine tradition, five LEDs stud the front in an X pattern, with the corner LEDs angled to match the angles of the fender. The four buttons were also angled for a more aggressive look.While the central rotary "cooker" knob makes for a great centerpiece, it is severely limited as it requires a screwdriver for proper operation. The actuator is flush with the body, which makes it impossible to turn with a finger. I originally had plans to use the knob for customizable "engine maps." Similar to how a race car driver can adjust his car's fuel mix and power level with the turn of a knob, I wanted to do something similar with TM8's cooker knob. I could make several different energy profiles in the firmware, and have them able to be set on the fly with a simple turn of the knob. But after seeing how the knob was a lot tougher to operate than initially expected, those plans kinda faded away.
The LCDs each hide an RGB LED underneath. These are not neopixels. I used conventional common-anode RGB LEDs, extremely thin ones at just 0.45mm thick. At the time of writing(12/26/2023), I have not been able to get the green and blue LEDs to work; just the red ones light up. I have a feeling this is a software error, so I'll get around to fixing it someday.
SENSORS
Time Machine Mk. 8 is my first creation to incorporate sensors directly on the PCB. There are three devices; an LIS3DH 3-axis accelerometer, a BME680 environmental sensor, and a MAX17048 LiPo fuel gauge sensor. The LIS3DH is capable of measurement up to +/- 16Gs, with built-in free-fall, motion, and tap detection, and interrupt pins. The BME680 contains a thermometer, a humidity sensor, a Metal-Oxide gas sensor, and a barometer, which can also be used to measure altitude. The MAX17048 is a temperature compensated battery fuel gauge sensor with built-in algorithms to continuously track battery SoC, eliminating the need for battery learn cycles required for traditional fuel gauge sensors.Here's a quick rundown of how all the I2C devices are wired on TM8:
I have not really incorporated the sensors into the watch's firmware yet. While I did go around to verifying they all work, the only sensor I actually use is the MAX17048, used to display battery percentage on the home screen. The two other sensors are pretty much unused at the moment.
I originally planned to have a 9-dof IMU on the watch, but existing options were either too big, too expensive, or required 1.8V for operation. After lots of research, I just decided to compromise with an accelerometer as it provided most of the features I was looking for.
PACKAGING
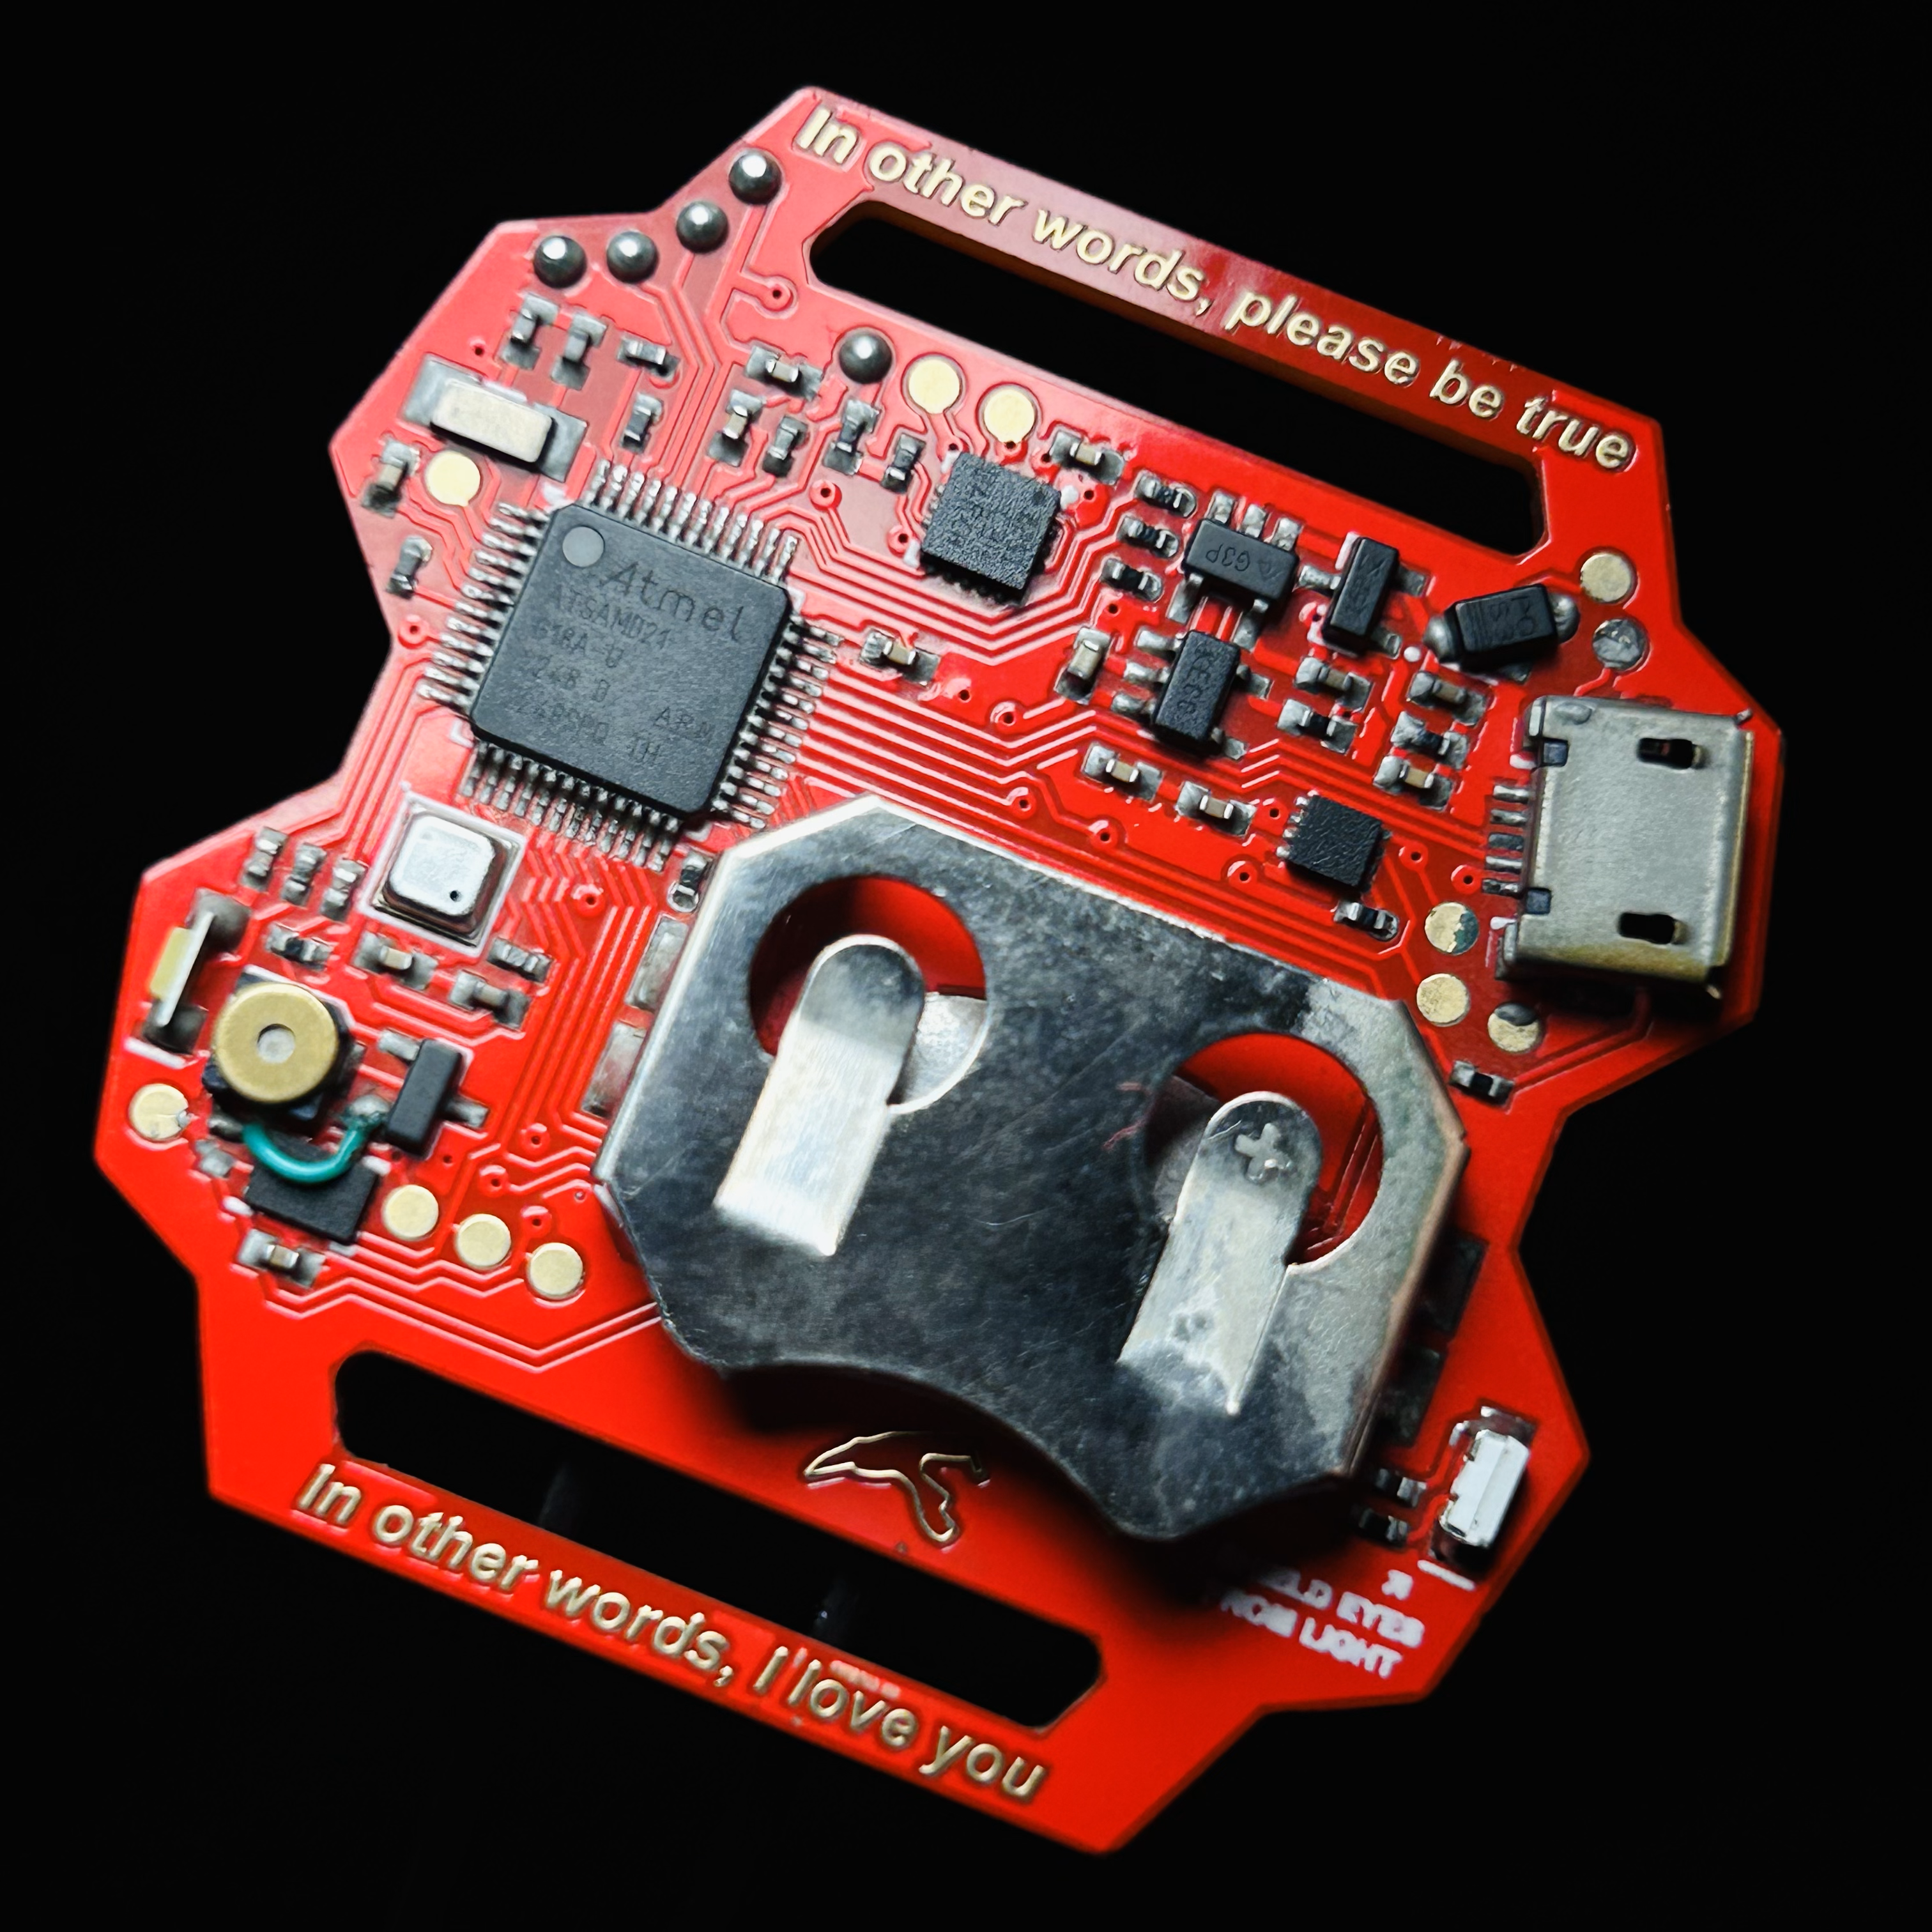
Packaging was a big theme in this project, as I had to fit so much into such a small space. It was especially challenging keeping almost all the components at the back to keep the design clean on the front. As the board was so densely packed, changing even one component meant everything around it had to move as well, so I had to make sure I was getting things right the first time when routing the board.Having the battery soldered directly to the PCB didn't help at all. The battery took up a significant amount of PCB area, leaving only a small amount to actually be used for components and traces. Just a glance at the back side shows how valuable space was on this project. Above the battery clip are components forming sort of an arc, pushed right to the edge where the battery will sit. Components were pushed into every corner and into the fenders, and every nook and cranny of the board is taken up by either components or traces. Somewhat ironically, I think the backside of Time Machine Mk. 8 is one of the most beautiful things about it.
ERGONOMICS
The Time Machine Mk. 8 was going to be a tool for everyday use; I know some people call this sort of stuff their everyday carry, or "EDC." This meant ergonomics and comfort had to be considered. Fortunately, none of the previous Time Machines were particularly uncomfortable, so I felt there wasn't much to improve for TM8 in this regard. Its smaller dimensions definitely helped, and its narrower 20mm NATO strap also contributes to a lighter, less cumbersome feel. The fenders now poke less into my skin, and I've had no issues having it on while working out or going for a run. It's pretty comfortable around my wrist and I often forget about it until I need it, which is exactly how a watch should be.The watch is also surprisingly hardy in inclement weather. I wore it outside in pouring rain on multiple occasions covered only by a shirt sleeve. Although it got some water on the front, it did not malfunction at all. I did once get it pretty wet under heavy rain, and water went underneath the LCDs. It stopped working for about ten minutes, then recovered back to normal. On days with very light rain, sleet, or fog, I can wear Time Machine Mk. 8 uncovered without a problem.
I think putting all critical components on the backside really helped with TM8's every day usability. It keeps everything away and protected from the elements, while also maintaining a clean, uncluttered look on the front.
MISCELLANEOUS
The five auxiliary LEDs studding the front of the watch is mostly for styling. I have not incorporated them much into the firmware, so they only do a fancy animation on boot-up and not much more than that.TM8 also has twin floodlights, one on each side so that I can always have one pointng in the right direction regardless of which hand I wear it on. They are right-angle mounted, so they shine out from underneath the watch. I put these in to be used as flashlights, but they are nowhere near as bright to be used as one, even with lower value resistors.
I added a small 3mm x 3mm piezo speaker on the watch, amplified by an N-channel MOSFET. It's loud enough, but I wish it was a bit louder. The volume seems to be at its loudest at 4KHz, and drops off if the frequency is higher or lower. Worst of all, it gets pretty hot even with around ten seconds of continuous use, so it can only emit short beeps and boops.
I added a SPI Flash IC below the piezo to store small bits of data, say chronograph splits or configuration settings, but I have not been able to get it work. However, I don't see anything wrong in the schematic, so it might just be a software error.
◀ POWER ▶

BATTERY
Time Machine Mk. 8 is powered by a rechargable LIR2032 Lithium Polymer coin cell battery. It shares its dimensions with the universally popular CR2032 battery, so a 20mm diameter and 3.2mm thick. However, it's 3.7V instead of 3.3V, and the different battery chemistry means capacity takes a hit; it's 40mAh compared to the CR2032's 200mAh. However, this did not prove to be much of a hassle, as TM8 has consistently shown almost full-day battery life with months of daily use and hundreds of charging cycles. I'll most likely stick with LIR2032s for future portable and wearable projects, as it's proven its effetiveness in TM8 while also being very cheap.POWER MANAGEMENT
The ATSAMD21 microcontroller offers truly excellent power management features. With most of the power-hungry peripherals disabled, I reached around 14 hours of always-on display operation, which equates to around 2.8mAh of current consumption. I'm pretty satisfied with what I have, but with just a bit more work, I'm confident I can get always-on current to well below a milliamp.The watch is programmed to stay in standby mode most of the time. Every second, it wakes up for a couple milliseconds to measure the battery and refresh the display, but that's about it. I did add a lower-power mode where the watch would stay blank and only show the time for a couple seconds upon button press, but I haven't yet measured its power consumption. Obviously it would be much lower than that of always-on display mode, but I'm pretty happy with the battery life right now, so I don't use the lower power mode.
USB-battery switchover is handled by a P-channel MOSFET, specifically a DMG1045U with a couple passive components. I used this excellent write-up on load sharing circuits as a guide and reference design. It was incredibly detailed and helpful in my understanding of basic battery circuits and ICs, an area I have no treaded prior to this project. I also used parts of his DIY digital watch project as references when designing Time Machine Mk. 8.
Essentially, the watch is normally powered by the LIR2032 battery, with an MCP73831 and MAX74831 handling charging and level monitoring, respectively. As the battery runs at a nominal voltage of 3.7V, I have to regulate it down to 3.3V for the watch's operation, done with an AP2112K LDO. A P-channel MOSFET is wired upstream of the regulator, with its gate connected to 5V USB input. Normally pulled down to ground with a resistor, the MOSFET closes when USB power is connected, shutting off the battery from the rest of the watch. The battery, now safely isolated, can get charged by the MCP73831, while the watch runs off external USB power.
I never really paid much attention to charging, I always just plug it in and forget until it's time to go somewhere. But I think it takes roughly 45-ish minutes for a full charge from zero.
This simple yet extremely effective system has proven to be rock-solid during all the times I've worn Time Machine Mk.8, and will from now on be my reference design when designing battery powered devices with built-in charging.
◀ FIRMWARE ▶

DEVELOPMENT
Time Machine Mk. 8's firmware is written completely in C++, using the Arduino platform with PlatformIO on VSCode. I was originally planning on writing it using ASF, but with no experience outside of the Arduino Platform at the time, I found it too difficult to even start about with the basics. So, I stuck with Arduino for its ease of use. Plus, the SAMD21 seemed to have plenty of horsepower to handle all of Arduino's abstraction layers without bogging down the interface. However, I had to modify a lot of the Arduino libraries to fit with my project's unique hardware requirements, mainly its two I2C ports.I faced my first major hurdle when trying to get the sensors to work. For some reason, the LIS3DH and BME680 were getting detected on the second I2C bus, but none of them would work. I eventually realized it was a small hardware quirk of the SAMD21 that was messing with my SERCOM implementation, and once I got that figured out, all devies on both I2C buses worked fine.
The rest of the firmware was relatively easy, mainly because the SAMD21's built-in RTC kept track of time in the background, allowing me to use the microcontroller to handle other tasks. I made generous use of timers to keep track of time, whether it was for a chronograph function, or simply returning back to the home screen after three seconds of inactivity in the menu.
I definitely want to re-write the entire thing in ASF to gain more granular control over TM8's hardware, but it would be quite the ordeal, and I simply can't find the time for such a task with where I am in life right now, which is really a shame. Microchip's line of microcontrollers are excellent and I want to keep using them, so I'll have to learn ASF at some point. Just not now I guess.
Frankly, I don't use the watch for much at all outside of just telling the time, but I still implemented several features, some of which occasionally come in handy.
CHRONOGRAPH AND TACHYMETER
Once I got basic timekeeping done, the first two features I added was a chronograph and a tachymeter. As so much of my watch was inspired by cars and motorsport, it felt necessary to tie the theme into the software side as well.The chronograph is a simple stopwatch with millisecond precision that can track up to 99:59:59.999 minutes. On TM8's 8-digit display, the first two digits are used for the minutes, the next two for the seconds, and the next three for the milliseconds. The final digit is used to track split records. With a total of ten slots, the user can press a button when the stopwatch is running to record a split. Ten splits can be recorded, the final digit of the display incrementing by one with each split taken. The split is shown momentarily on the display before switching back over to the stopwatch.
The Tachymeter is a variation of the chronoraph. It can measure up to 9:59.999 minutes. This is to allow up to a hundred splits to be recorded. A digit is "taken away" from the hours display, and instead used to show the number of splits recorded. where the user can select from a handful of racetracks. So far I have implemented Suzuka, Monza, Nurburgring Nordschleife, and Monaco. Now, when the user takes a split, it records the average velocity as well, and stores it along with the split time.
Recorded splits can be viewed later, even after exiting from the chronograph or tachymeter. The user can browse through records in sequential order. Records for the chronograph and tachymeter are kept separate, and they stay stored in memory until new records are taken, or power is cut off.
Testing the chronograph for accuracy yielded ok results. I started both the Time Machine Mk. 8's chronograph and my computer's stopwatch at the same time. I checked both from time to time, and one would be ahead of the other by some amount, but no more than by about a second. I stopped both at the twelve minute mark, and they were both roughly in the same time with a discrepancy of around two seconds. Not quite the accuracy I wanted, but I think this is most likely due to the external 32.768KHz crystal connected to the SAMD21. It has a tolerance of 5ppm, which means it can vary in frequency by +/- 0.16Hz. Now, I have no idea if this much variance in frequency can justify my chronograph's subpar accuracy, but that's the only explanation I can think of.
Unfortunately, I haven't been able to get these stopwatches to pause, so they can only measure elapsed time in one "take." However, I basically never use these features, so I don't mind this, although I definitely will need to fix it at some point.
MOUSE JIGGLER AND SCREEN LOCK SHORTCUT
Often at school, I had to leave my computer running while I left for an extended period of time. Usually I used a mouse jiggler app to keep my computer from sleeping while I was away. However, for every new computer I used in the computer lab, I had to re-download the app and run it, which was getting pretty annoying. I figured a simple hardware solution would be much better. Fortunately, the SAMD21 microcontroller has native USB, which means it can emulate a variaty of USB devices such as mice and keyboards. So, I added a mouse jiggler feature to Time Machine Mk. 8, as well as a screen lock shortcut.It's very simple: in the home screen, the press of a button takes the user to a menu with several available USB HID utilities. The press of another button puts the watch into mouse jiggler mode, there the watch constantly moves the cursor around in a small diamond pattern indefinitely until the user presses the button again. That's all there is to it!
The screen lock shortcut can be accessed in a similar fashion. It types Windows Key + L, which instantly puts any windows computer into its lock screen. This is extremely useful for when I need to take a short break from my computer and don't want anyone snooping around my machine.
While that's it for now, I'm also planning to add a simple password manager on my watch, where I can select from a list of online accounts, and with the press of a button TM8 can type out my credentials for me, eliminating the worry of typos or forgetting my passwords. My only concern is that anyone with basic knowledge of embedded systems can dump the flash contents of my watch and access all my online credentials there, so I will need to find a way to encrypt all my online info to ensure maximum security.
SOBRIETY TEST
It's always important to keep track of your alcohol on a fun night out. I made a small game to check my sobriety whenever and wherever. It's a simple three-strikes-and-you're-out reaction game. One the left LCD, a random number from 0 to 9 is displayed. That is the target. The right LCD loops through numbers 0 to 9 quickly, and the objective is to hit a button when the values on both LCDs match. Right now, I just have the game programmed to end after three hits, but I should fix it so that the hit counter resets to zero upon a miss. I'm also planning on adding more games, in case I forget to bring my phone to the toilet.POMODORO TIMER
I also implemented a pomodoro timer into Time Machine Mk. 8. It features a customizable study plan, so I can set how my desired study and break times, as well as the number of study sessions. It defaults to a 4/25/5 plan, meaning four sessions of 25 minutes of studying with 5 minute breaks in between. When the timer is active, the display stays blank to avoid distractions, but the remaining time, down to the millisecond, can be checked with a button press. The current time can also be checked with a button. The timer warns with the piezo and LEDs ten seconds before time's up, both for studying and breaks.TELEMETRY
I wrote a very small app for the watch that displays live data from the on-board sensors. For the accelerometer, it displays g-forces measured on the X and Y axis. It does a pretty good job of tracking the watch's orientation, so I guess it can sort of be used as a level meter. TM8 can also display live temperature and humidity, but the accuracy seems to be way far off. I think it's just an issue with calibration, and a simple software fix should fix it.PERSONALITY
I wanted to add some of my own personal flair to the software, so I made a neat "scramble" animation as transitions between screens and menus. It scrambles the text on screen and "de-scrambles" it, making transitions smoother and gives Time Machine Mk. 8 a lot more personality.I wanted to tie my love for cars even into the firmware, and I was not satisfied with the chronograph and tachymeter alone. Taking inspiration again from the Lancia Stratos, I made the whole interface deliberately "twitchy" to mimic the Stratos's twitchy, overcaffeinated personality. The delay when scrolling through menus and lists are pretty short at 100 milliseconds, and the display contents often blink or flash rapidly to acknowledge confirmation. At first it was a little annoying dealing with such an interface but I quickly got used to it.
PLANNED FEATURES
I plan on using the sensors for much more. The LIS3DH's tap detection and interrupt pin seems like an excellent way to wake TM8 up from standby, much better than pressing a button. It has free fall detection as well, so TM8 can have its piezo at full blast with all LEDs on when a drop is detected, to make it easier to find, especially at night or under furniture. I also have plans for a small "breathe" app, where the LEDs fade in and out at a certain frequency to match my breathing to, if I need to reduce my anxiety.Ultimately, I want to slowly make Time Machine Mk. 8 a tool for daily use, not just a watch to show off to my friends. Almost like an extension of myself.
◀ FABRICATION ▶
Fabrication for Time Machine Mk. 8 was truly a process of equal parts unbridled excitement and stressful anxiety. It was my first time working with such small parts and I had to get things right the first time, as I did not have a hot air gun to fix things if anything went wrong. Fortunately, I was able to get one assembled and running on the first try with minimal hurdles. I honestly still can't believe I did all this with my mom's skillet and my dollar store solder iron. I guess luck really was on my side for this project.
Assembly started with squeegeeing solder paste onto the backside of the PCB through a stencil. Then, I very carefully placed each and every component with a tweezer, especially keeping my hand steady when placing the sensors. Once all parts were correctly placed, I put the board on my mom's skillet, heated up our brand-new induction stovetop, and reflowed the board right there on the pan. As soon as all the parts were soldered in place, I quickly turned off the heat, transferred the PCB onto a cool surface (my mom's granite countertop), and let it cool for a bit. Then, I checked the PCB for any tombstoning, cold joints, or shorts, and once I confirmed everything was fine, I soldered the top by hand. Then I would check the board throroughly for any shorts with a multimeter, then clean it with some alcohol and q-tips. Then, I held my breath, and connected power through the micro USB port. I am happy to say nothing smoked, burned, or exploded.
As the SAMD21G18A does not come with a USB bootloader from factory, I had to bootload it on my own, with exposed solder pads on the backside of TM8. I had an Arduino M0 with a built-in debugger, so I simply wired TM8's test pads to the zero's SWD debug out signals. Bootloading was fairly easy. I followed Adafruit's excellent guide to burning SAMD bootloaders.
After burning the bootloaer, the Time Machine was then fully ready for firmware development.
◀ LIMITATIONS ▶
MINOR NITPICKS
As much as I love Time Machine Mk. 8, it isn't without its limitations. The backlight barely works, and it is too focused on a singular point and doesn't diffuse evenly through the back of the display, making a very uneven glow. The flashlights are too dim. The piezo buzzer gets too hot with extended use and is not quite the volume I desire, and the SPI Flash IC does not work.SUSTAINABILITY
However, I think the greatest problem is with the display; but I'm not talking about the display itself. I absolutely love the way it looks and how easy it is to work with at such low power consumption. I'm talking about sustainability. The display is from a private party sold through his own personal e-Bay store. I had a short converstaion via e-mail with the guy, and he told me they were old stock from samples he bought a while ago. It's been almost a year since I last bought these, and it seems he still has them in stock, but I have no idea how long they will last. Also, they're quite expensive at 12 bucks a pop and the costs would add up quickly if I were to use this display for future Time Machines. Maybe for the next generation Time Machine Mk. 9, but I really want a cheaper replacement after that.◀ THE FUTURE ▶
I believe Time Machine Mk. 8 has reached a point where I can't really stuff any more into the circuit board; I barely have space left over for an extra resistor. However, I believe there is still plenty of room for improvement without taking up any space.MODULARITY
With the use of very small board-to-board connectors, I believe I can make future Time Machines modular. The base Time Machine would only have the main microcontroller and power management systems, along with connectors wired to I2C, SPI, and UART signals. Then, I can design "payloads," small PCBs that can clip onto the back of the Time Machine to add additional functionality, whether it be sensors, wireless, or extra I/O. This massively increase the everyday practicality and flexibility of my Time Machines, allowing me to add extra features without sacrificing PCB area.WIRELESS
I've also considered replacing the ATSAMD21G18A with an ESP32. I see it used quite often for wearable and portable projects, and it has quite the spec sheet, with more than enough horsepower, Wi-Fi and Bluetooth connectivity, and even native USB on select models. Wireless connectivity would add a whole new dimension of features to future Time Machines, especially when connected to external power, as I don't think it would last long on a 40mAh battery with Wi-Fi enabled for extended periods. Also, after using my mom's skillet to reflow 0402 size parts, I think I'm ready to solder QFN package ICs as well. In fact, the three sensors, the LIS3DH, BME680, and MAX17048, were all extremely tiny LGA or TDFN packages, much smaller than an ESP32 microcontroller. So I now feel pretty confident about working with such small ICs.◀ CONCLUSION ▶
I first want to thank my parents for being so incredibly supportive of my passion and hobby. They have been supporting my work since the very beginning, when I was just a scrawny boy in high school tinkering with Arduino boards in his room. They never hesitate to fund my projects, and it is only with their support that I'm able to pursue my dreams. Without them, nothing on this website would have ever been possible. Thanks Mom. Thanks Dad. I love you.The Time Machine Mk. 8 has been an incredible journey that often pushed my creativity to its limits. Never have I ever been so passionate about a project and sacrificed so much of myself to reach a goal. I'm so insanely happy and proud of myself that I was able to reach my goal, it truly is an incredible feeling unlike anything else. Even just looking at Time Machine Mk. 8, whether it be its delightfully retro display, gorgeous design, or exposed backside circuitry, it reminds me that I can achieve anything I want in life, as long as I give it my absolute best.